
License Proxy – SSH Tunnel
A step-by-step guide for Rescale customers to set up a license proxy using SSH tunnel mode on Rescale admin page.
An SSH tunnel is a secure way to allow Rescale jobs to access your on-premise license servera server is a computer program that provides services to oth... More. Rescale provisions an exclusive proxy server for the organization and the proxy server forwards license polling requests from software on Rescale’s platform to the organization’s local license server. This provides secure encryption – all license requests are passed through an encrypted SSH tunnel. There is a recurring monthly charge for the connectivity to the Rescale proxy server.
User’s role with the company:
- The user should be an IT/network admin.
- The user should be able to make changes on the gateway device, including firewall rules.
- The user should have admin rights on the on-premise license server.
User’s role relative to Rescale:
- The user should have an account on Rescale.
- The user’s Rescale account should be a company administrator for the company’s Rescale account. To become a company admin, email support@rescale.com.
License server computer and permissions: the computer that will run the SSH tunnel (usually the license server) must:
- Allow outbound SSH access on port 22. Alternatively, if a customized SSH port other than the default is used, the user must know which port that is and have outbound SSH access on that port.
- Have an SSH keypair (public + private) generated and saved on the license server machine or the computer from which the SSH tunnel needs to be initiated to complete the license proxy setup. To generate one, follow the instructions at How to Generate SSH Key pair.
- For Windows: Must have the open source SSH bundle containing Plink, PuTTY, PuTTYgen and Pageant downloaded. Download the bundle here.
License prerequisites:
- The license file must be a floating license, not node-locked.
- The vendor port in the license file must be fixed. For how to fix license port in FlexLM and RLM (e.g. ANSYS, STAR-CCM+, Converge, Comsol, etc.), see How to Fix Vendor Port.
- The public IP address of your internal network. This is ideally the public IP of your gateway/router/network device.
- On Mac/Linux you can run
curl ifconfig.mefrom a terminal to get your public IP. - On Windows, run
nslookup myip.opendns.com resolver1.opendns.comfrom a terminal and use the non-authoritative answer.
- On Mac/Linux you can run
- The hostname for the on-premise license server. The hostname can be obtained by running
hostnameon your license server. - List of software for which you have licenses, and associated license and vendor ports.
- License ports can be found in the same line as above – they’re the number at the end of the
SERVER(FLEXlm)/HOST(RLM) line. Some standard license ports:
- License ports can be found in the same line as above – they’re the number at the end of the
| Software | License port |
| ANSYS | 1055 or 2325 |
| STAR-CCM+ | 1999 |
| ABAQUS | 27000 |
| COMSOL | 1718 |
| CONVERGE | 2765 |
| LS-DYNA | 31010 (and no vendor port) |
- Vendor ports can be obtained from the license file as the number at the end of the
VENDOR(FLEXlm) orISV(RLM) line. If you don’t see a number there, make sure you fix your vendor ports before continuing. The linked article also has information on how to confirm your vendor port is set by checking license log files.
This information has moved: How to Fix Vendor Ports
This section lists the steps to set up a license proxy on the Rescale admin page. The license proxy setup on the Company Administration Page can be accessed at license proxy page.
- Navigate to the Rescale Administrator page from your accounts to start the setup of license proxy
- Navigate to Integrations >> License Proxies
- Select Add New
- The page will look similar to the screenshot below:
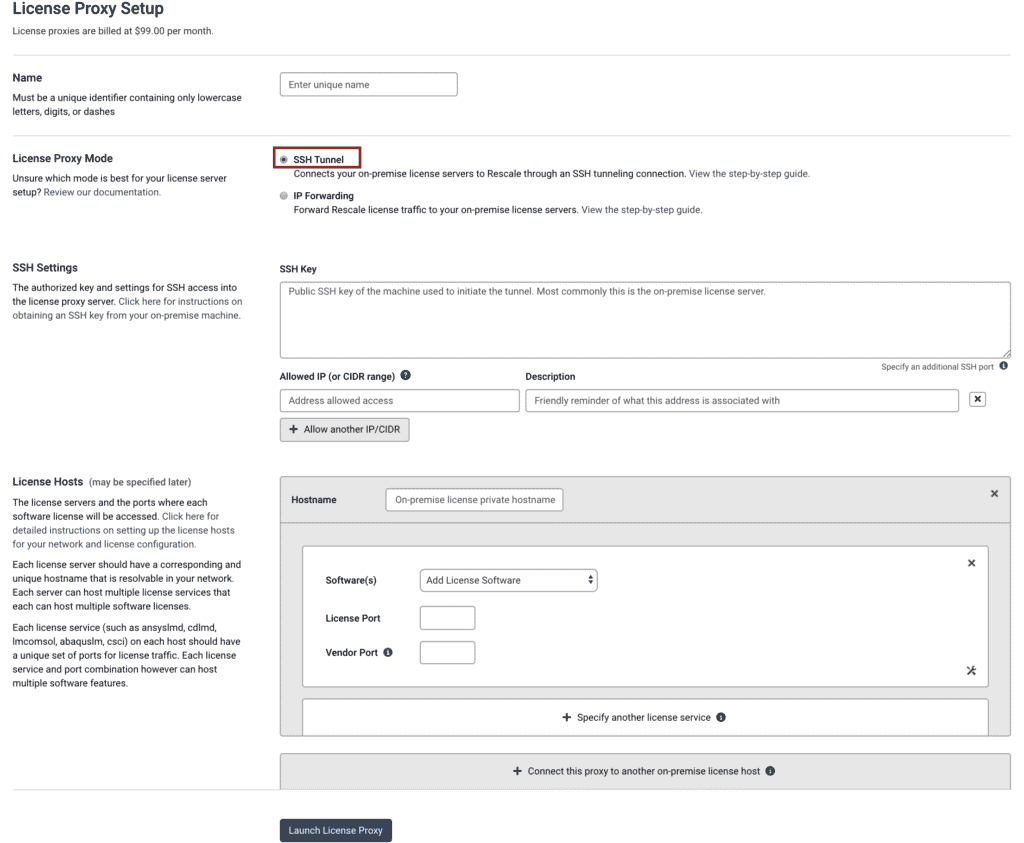
- Give a Unique Name for the license proxy
- Select SSH Tunnel as the “License Proxy Mode”
- Paste the license server’s public SSH key in the SSH Settings section. If you are unsure on how to do this, please check out this page on SSH Keys How to Generate SSH Key pair.
- You can also specify an additional SSH port if in case if using a customized SSH port than the default SSH port (22) using the Specify an additional SSH port option in the bottom right corner below the SSH key field in the SSH keys section. For e.g if you are using 443 as the SSH port, you can select Specify an additional SSH port option and add 443 as shown below:

- Add an allowed IP in the “Allowed IP (or CIDR range) field Rule . This is the public IP of your on-premise network to allow SSH access. Info on how to find your public ip above. The CIDR rule is required because this will enable the SSH tunnel execution from that location to the Rescale proxy. Every user in the company will be able to use Rescale and submit jobs as long as this tunnel connection is UP, regardless of the physical location. If the license server(s) are in the same network, then there has to be a public IP of that physical location added in the Access Rules.
- If you want to add multiple IPs in the “Allowed IP” field, click on “Allow another IP/CIDR” button.
- Now, add the the license port information in the “License Hosts” section.
- Enter the resolvable Hostname of your on-premise license server machine. How to find your license server’s hostname above
- Remember that the hostname isn’t a fully qualified domain name; that is, it shouldn’t have any periods (
.) in it.
- Remember that the hostname isn’t a fully qualified domain name; that is, it shouldn’t have any periods (
- Select the software that you want to configure the license proxy for from the “Software(s) dropdown. Please choose all the softwares that you want to configure in the software section. For example if you are using COMSOL Multiphysics in batch as well as COMSOL Multiphysics GUI in a Rescale Desktop, then you should choose both COMSOL Multiphysics as well as COMSOL Multiphysics GUI in the software entry. Then, for each software:
- Set the License Port. This port is the port that the job refers to while checking out license. This is the license port that is being used by the application on-premise on your license server machine.
- Enter the Vendor Port . This is the vendor daemon port that is being used by this software application.
- Information on how to find the license and vendor ports for FlexLM or RLM license services can be found above.
- For application such as LS-DYNA that uses LSTC or Dynamore license service, the vendor port is not required and the “Vendor port” field can be left blank.
Advanced Settings
You can also use the small “Toggle Icon” on the bottom right corner in license hosts section for advanced settings as shown below:
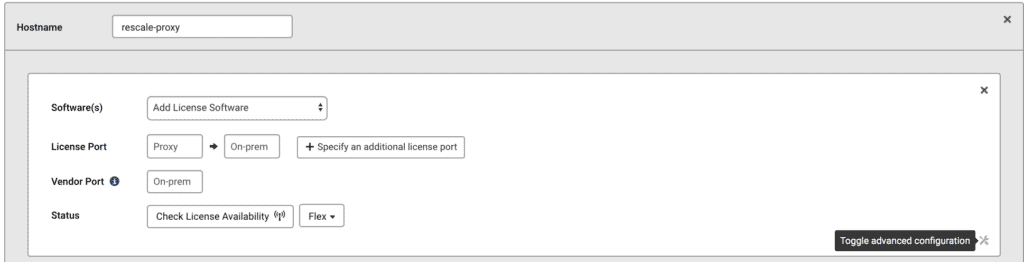
- This setting can be used when you have multiple software applications being hosted on different machines on-premise but using the same port. In such case you can choose a different or unique “Proxy” port to map to each different on-premise machine for those applications and choose those softwares from the list of softwares
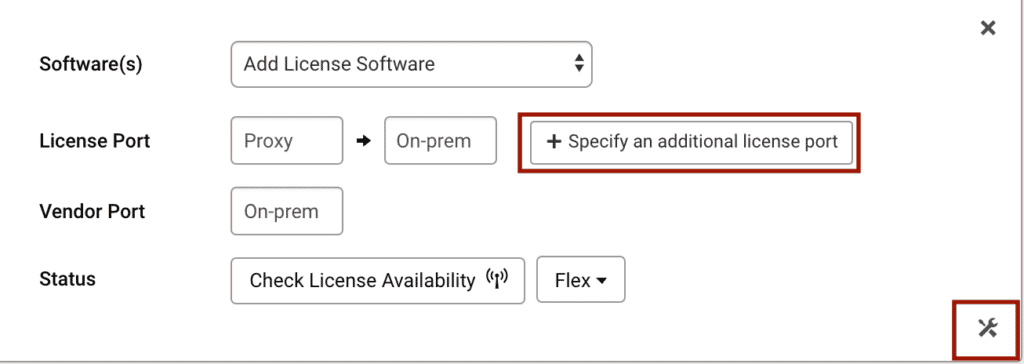
Specify Additional Ports
- This option can also be used if the application is using single license port but multiple vendor port (For e.g PowerFLOW) or multiple license port (For e.g ANSYS). You can choose “+ Specify an additional license port” option and add the multiple vendor ports or license port for the software as shown below:
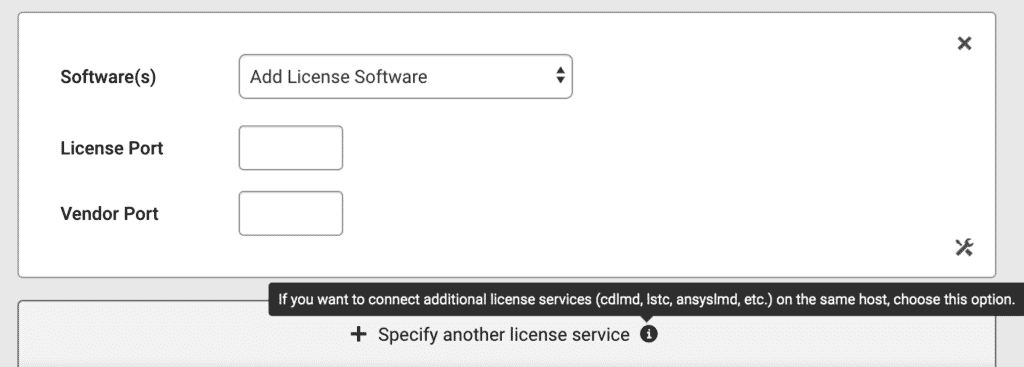
Specify Another License Service
- If you have multiple license services being hosted on a single host, and if you want to connect additional license services to same host, then you can choose the “+ Specify another license service” option as shown below and add the required port information for the same:
Connect this Proxy to another License Host
- If you want to connect additional applications that are being hosted on-premise on a different license server which has a different hostname and IP, you can choose the “+Connect this proxy to another on-premise license host” option as shown below:

- Once you are done with configuring all the details you can click on the Launch License Proxy button at the bottom of the license proxy page.
- The port information for the software you are using can be obtained from your license file (FlexLM or RLM)
- After making the above mentioned changes, click on the Launch License Proxy button
- You will now see a screen with status like the one below:
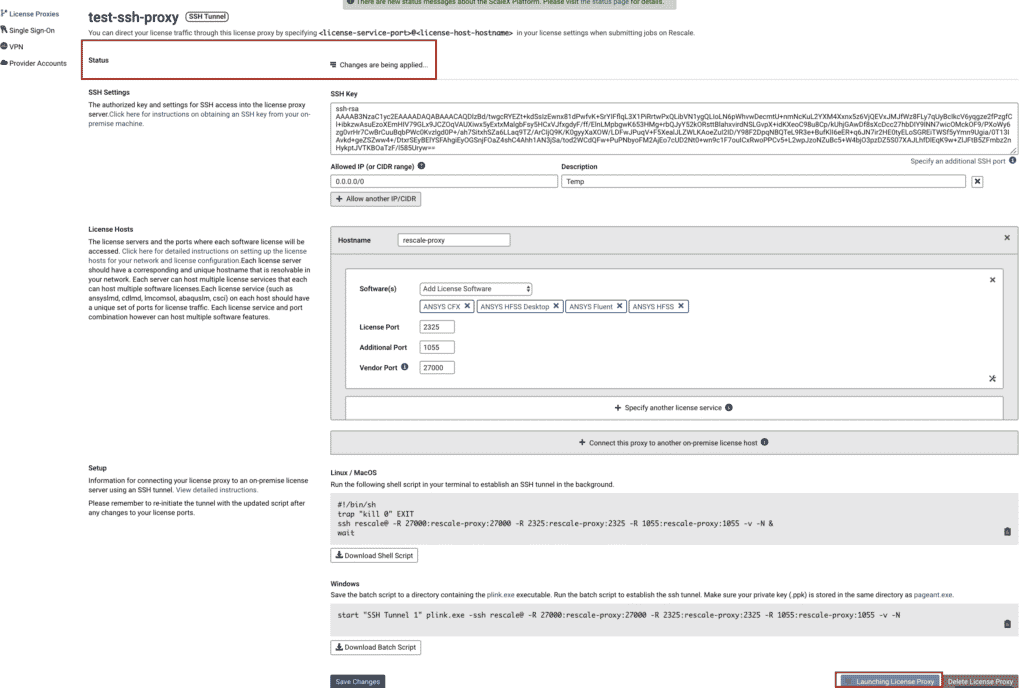
- Once the proxy is launched, you will see a Status and Info section at the top of the license proxy page. The Status section indicates :
- Proxy: If the license proxy launch was successful or not. If that status shows as UP in “Green” that indicates that the proxy was launched properly.
- Last Sync: If the last changes that you saved were successfully saved or not. If that status shows as SUCCESSFUL in “Green” that indicates that the last sync was successful.
- Connections: If there are active connections listening on that IP and port, this will show as ACTIVE in Green.
Note: If you see any of the Status in the status section in Yellow or Red that indicates that either the last sync was not successful or there are no active connections for the proxy. In such cases, please reach out to support@rescale.com
- Info – In this section you will see the public IP of the license proxy.
Once the license proxy is launched here are the steps to initiate the SSH tunnel connection:
- Ensure you have an SSH keypair on your local computer. See How to Generate SSH Key pair.
- Windows-specific instructions (in addition to generating your keypair)
- Ensure you download the entire PuTTY suite of tools in a single directory, like
C:> Documents> Rescale tunnel. This should include:- Plink – to be used to run the executable
- PuTTY – to be used as SSH terminal
- PuTTYgen – to generate the (private/public) key pair
- Pageant – to enable private key for connection
- Ensure you download the entire PuTTY suite of tools in a single directory, like
- Windows-specific instructions (in addition to generating your keypair)

- Save your private and public keys in the same directory.
2. Paste your public SSH key on the license proxy setup page. Ensure you’re not missing any characters at the beginning or end.
- Linux: run
cat ~/.ssh/id_rsa.puband copy the results. - Windows: copy the public key directly from PuTTY Key Generator or use a text editor to view the file you saved in the directory with all the PuTTY tools.
3. Download the SSH batch script. You can click the “Download Batch Script” button from the setup section, or click the clipboard icon to copy it to your clipboard. Ensure you download the batch script for your operating system.

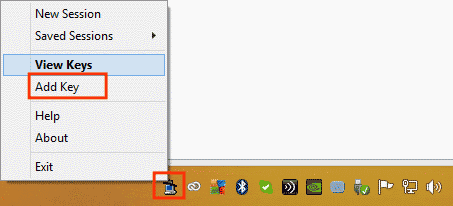
4. Windows-only: Import keys into pageant
- Open pageant.exe to launch the key manager, it might launch in the Windows taskbar
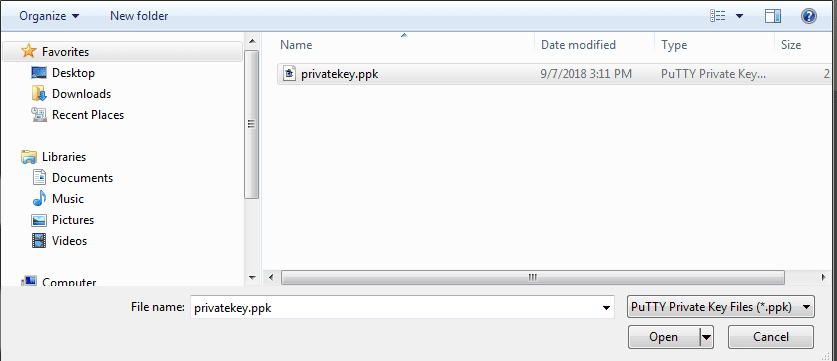
- Look for the pageant.exe icon in the taskbar, right click on it and select Add Key
Select the private key that you generated in the above step to import it into pageant and click Open
- Once you have all the files in a single folder from the steps above, open command prompt window and navigate to the folder where you saved all your SSH-related files.
5. Run the command listed in the shell script, from start or ssh through -v -N &. It might look something like:
- Linux:
ssh username@license-proxy-name.tunnel.rescale.com -R 1055:on-prem-license-server-1:1055 -R 2325:on-prem-license-server-2:2325 -R 49281:on-prem-license-server-3:49281 -R -v -N &. - Windows:
plink.exe -ssh username@license-proxy-name.tunnel.rescale.com -R 1055:on-prem-license-server-1:1055 -R 2325:on-prem-license-server-2:2325 -R 49281:on-prem-license-server-3:49281 -v -N
At this point, you should have an SSH tunnel between the license server and the Rescale license proxy.
Please note:
- The SSH tunnel must be running any time there are jobs running on Rescale or on-premise using the license proxy. If the SSH tunnel is killed or stopped for any reason while there are active jobs in flight the jobs will fail to check out a license.
- Because of this, Rescale recommends that you run the SSH tunnel script from a license server machine or a computer with high uptime and not a laptop.
To test your connection and verify your configuration:
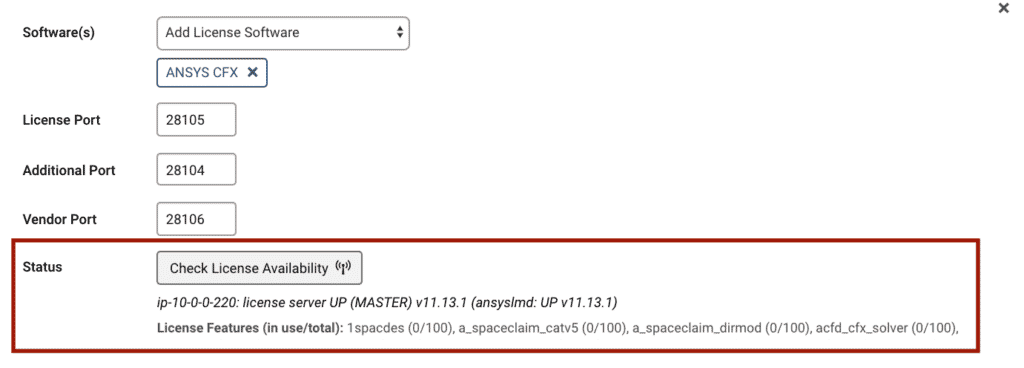
- Click on the “Check License Availability” button in the “License Hosts” section on the company license proxy page and that should give you all the license features along with the number of license seats you have available.
- For FlexLM or RLM type of license service if the “Check License Availability” shows as “The license server is down or not responding”, this means one of the following:
- The SSH tunnel connection is not configured correctly and the SSH tunnel is not UP and running
- The on-premise license server is not active or there is no active license process currently being served on your on-premise license server. Please check with your IT/Network or the license server admin team to check for the firewall settings or the license server status.
- No license is being served on the on-premise license server machine
- Submit a test job by logging into your Rescale account
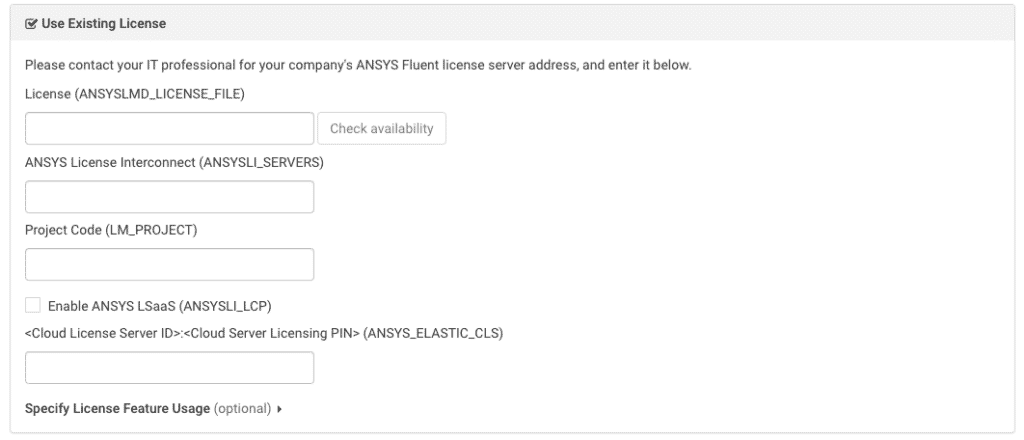
- Create a new job by clicking the +New job button in the top left of the page. Select the Software you want in the software section and select Use Existing License option as shown below.
- In the appropriate field type in port@hostname. For example if you have configured ANSYS software on the license proxy and your license port is 1055, then enter 1055@hostname then click the “Check availability” button. The license prompt will provide you with immediate feedback for whether the license server address specified in the license settings is reachable from the Rescale platform by clicking the ”Check Availability” button. It will also display all the license features and the associated license seats available for your licenses.
If you see the tunnel status to be in Yellow saying No active connection, that means the SSH tunnel is not up and running.

Possible reasons:
- On-premise workstationA workstation is a powerful computer system designed for pro... More running the tunnel got restarted
- Pageant is not loaded with the private keys while running the SSH tunnel script
- Private keys were deleted or moved
- The “Allowed IP or CIDR range” is not correct
- License server is down for any reason
- The license service (i.e lmgrd or rlm) has exited
- The licenses have expired
- The Vendor port changed for some reason (probably because it was not fixed in the license file)
To set up your SSH tunnel to reconnect after a reboot automatically, first make sure you have successfully connected to the tunnel once manually. Then follow these steps:
Windows Server
Some minor changes will need to be made to the batch script provided in your admin portal:
- Remove
start "SSH Tunnel 1"from the beginning of the script. - Add
-i C:\Users\<Username>\.ssh\id_rsa.ppkto include the path to your PPK SSH key after-ssh. - Add
-batchto the end of the script. - Make sure you place this script in the same directory as plink.exe.
- Your final batch script should look something like this:
plink.exe -ssh -i C:\Users\.ssh\id_rsa.ppk rescale@clp.tunnel.rescale.com -R 4085:Server:4085 -R 4084:Server:4084 -v -N -batch
Next we will set up the Task Scheduler to run this at boot:
- Create a new task and under the General tab set to “Run with highest privileges” and “Run whether user is logged in or not”.
- Set the trigger to begin the task at startup.
- Set the action to start a program.
- Set the program as your batch script.
- Set start in as the directory your batch script is located.
Linux Systemd
These commands should be run as boot:
- Create tunnel.sh using the Linux/MacOS command you use to create the SSH tunnel in /root.
- Create the systemd service using
vi /etc/systemd/system/tunnel.service
root# vi /etc/systemd/system/tunnel.service
      [Unit]
      Description=Tunnel Test Daemon
      After=network.service
      Requires=network.service

      [Service]
      Type=simple
      ExecStart=/root/tunnel.sh
      Restart=on-failure

      [Install]
WantedBy=multi-user.target- Start the service using
systemctl start tunnel. - Tell the service to run at boot using
systemctl enable tunnel.
Note: When automatically starting your SSH tunnel, ensure you do not have more that one tunnel at a time to the CLP. This will cause errors with your license proxy.
Authentication Error/Public Key Denied
I am unable to establish SSH tunnel connection from my Windows computer. I get Authentication error or public key denied. What does this mean?
This can be because of a few reasons:
- Either your private SSH keys are not added into pageant while you run the SSH Batch script.
- The public SSH keys that you pasted in the “SSH keys” section on the license proxy page is incomplete or missing some portion from the end of the key (mostly when you copy the public SSH keys from notepad and not PuTTyGen directly)
- The private key type (.ppk) is not supported by Windows for authentication. In this case please convert your private SSH key from .ppk format into .pem format using PuTTYgen. Here is how you can do this:
- Start PuTTYgen.
- From Actions, choose Load, and then navigate to your .ppk file For e.g if your private key name is “private_key.ppk” choose that key.
- Choose the .ppk file, and then choose Open.
- From the menu at the top of the PuTTY Key Generator, choose Conversions, Export OpenSSH Key.
Note: If you didn’t enter a passphrase, you receive a PuTTYgen warning. Choose “Yes”, name the file and add the .pem extension and choose “Save” and try re-initiating the SSH tunnel connection with the new .pem private keys added in pageant.
License Server UP Vendor Daemon Down
When I use the “Check License Availability” option on the license proxy page or from the license settings section when I set up a job it says “License server UP, Vendor “Down”. What does this mean?
This can happen for a few reasons:
- Your licenses expired. You can check the license file on your on-premise license server machine and check the expiry date to confirm. If the licenses have expired, get a new license from the ISV and have the license server admin install it on the on-premise license server machine.
- The vendor port configured on Rescale while establishing the SSH tunnel connection has changed to a different port. This is likely because the vendor port was not fixed in the license file and the on-premise license server got restarted for some reason. To fix this issue please fix the vendor port How to Fix Vendor Port, re-download the SSH tunnel script (Batch script or Shell Script) based on your operating system and re-initiate the SSH tunnel connection
Connection Reset by Peer/Connection Refused/Connection Timed Out Error
If you encounter a “Connection Reset By Peer”/”Connection Refused”/”Connection Timed Out error”, this is probably because there is a firewall in place that is causing the connection to fail. In such cases please use the following steps:
- Confirm that the network that you are using allows SSH port connectivity
- Verify the firewall rules, if any.
- Please ensure that the SSH port is not being blocked.
- Also make sure that you have the correct CIDR rule in place on the license proxy settings page in the “Allowed IP or CIDR range” section. You can add a wide/open range such as “0.0.0.0/0” while you are initiating the tunnel to see if CIDR range is an issue. If the connection is successful after you add the open rule (0.0.0.0/0) that means the CIDR range that you originally entered on the license proxy page is not correct. Please replace the CIDR range with the correct IP.
The license server is down or not responding
When I use the “Check License Availability” option on the license proxy page or from the license settings section when I set up a job it says “license server is down or not responding”. What does this mean?
This may mean:
- Your SSH tunnel is not connected properly
- On-premise license server machine or license service process is not active or running
- No licenses are being served on-premise on the license server machine
- The license service software that you are trying to query the licenses for does not support the “Check License Availability” feature. This can happen with either RLM or DSLS.
- There is no license proxy set up in your company account and you only have a VPN tunnel set up with Rescale to run jobs.
In such case, please contact your IT/Network team or the license server admin to confirm and try re-initiating the tunnel connection once the license server is up and running.