Quick Tip: Compress Your Output Files

One of the key challenges with cloud HPC is minimizing the amount of data that needs to be transferred between on-premise machines and machines in the cloud. Unlike traditional on-premise systems, this transfer occurs over a much slower and less reliable Wide Area Network. As we’ve touched on previously, the best thing to do is perform post-processing remotely and avoid transferring data unnecessarily.
That said, a common scenario for many users is to run a simulation and then transfer all of the output files from the job back to their workstation.
After a job has completed, each file in the working directory is encrypted and uploaded to cloud storage. This provides flexibility for users that only need to download a small subset of the output files to their machine. However the tradeoff is that each file introduces additional overhead in the transfer. When transferring data over a network, the more data that can be packed into a single file, the better. Further, many engineering codes will emit files that are highly compressible. Although compressing a file takes extra time, this can still be a net win if the time spent compressing plus transferring a smaller file is less than the time spent uploading the larger, uncompressed archive. Even if the compression and ensuing transfer takes longer overall, the real bottleneck in the overall transfer process is going to be the last hop between cloud storage and the user’s workstation. Having a smaller compressed file to transfer here can make an enormous difference depending on the user’s Internet connection speed.
If you know beforehand that you will need to download all of the output files for a job, then in general it is best to generate a single compressed archive file first instead of transferring each file individually. The linux tar command provides an easy way to create a compressed archive however it does not utilize the extra computing power available on the MPI cluster to generate the archive.
Jeff Gilchrist has developed an easy-to-use bz2 compressor that runs on MPI clusters (https://compression.ca/mpibzip2/). We compiled a Linux binary with a static bzip2 library reference and have made it available here for download to make it easier to incorporate it into your own jobs. The binary was built with the OpenMPI 1.6.4 mpic++ wrapper compiler. Please note that it may need to recompiled depending on the MPI flavor that you are using.
To use it, upload the mpibzip2 executable as an additional input file on your job. Then, the following commands should be appended to the end of the analysis command on the job settings page.
tar cf files.tar –exclude=mpibzip2 *
mpirun -np 16 mpibzip2 -v files.tar
find ! -name ‘files.tar.bz2’ -type f -exec rm -f {} +
First, a tar file is created called files.tar that contains everything except the parallel bzip utility. Then, we launch the mpibzip2 executable and generate a compressed archive called files.tar.bz2. Finally, all files except files.tar.bz2 are deleted. This prevents both individual files AND the compressed archive from being uploaded to cloud storage.
Note that the -np argument on the mpirun call should reflect the number of cores in the cluster. Here, the commands are being run on a 16 Nickel core cluster.
One additional thing to be aware of is that Windows does not support bz2 or tar files by default. 7-Zip can be installed to add support for this format along with many others.
As a quick test we built compressed archives from an OpenFOAM job that contained 2.1 GB worth of output data spread over 369 files and uploaded the resulting file to cloud storage.
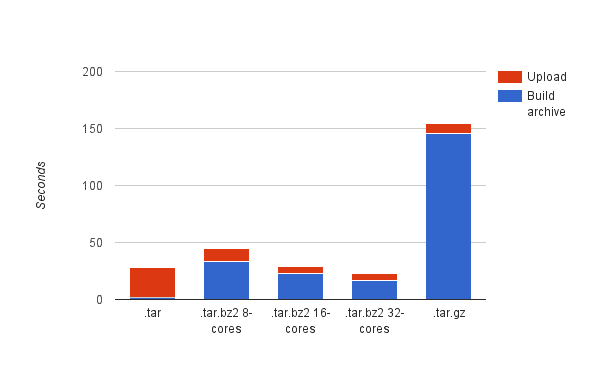
As a baseline, we built an uncompressed tar file. We also tried creating a gzip compressed tar file using the -z flag with the tar command. Finally, we tried building a bz2 compressed archive with 8, 16, and 32 Nickel cores.
Not surprisingly, in the baseline case, building the archive takes a negligible amount of time and the majority of the overall time is spent uploading the larger file. When compressing the file, the overall time breakdown is flipped: The majority of the time is spent compressing the file instead. Also unsurprisingly, leveraging multiple cores provides a nice speedup over using the single-core gzip support that comes with the tar command. At around 16 cores, the overall time is roughly the same as the baseline case.
The real payoff for the compression step however will become evident when a user attempts to download the output to his or her local workstation as the compressed bz2 file is almost 5 times smaller than the uncompressed tar (439 MB vs 2.1 GB).
To reiterate, we believe that pushing as much of your post-processing and visualization into the cloud is the best way to minimize data transfer. However, for those cases where a large number of output files are needed, you can dramatically reduce your transfer times in many cases by spending a little bit of time preparing a compressed archive in advance. We plan on automating many of the manual steps described in this post and making this a more seamless process in the future. Stay tuned!