Running CP2K on Rescale
Overview
CP2K is an open-source atomistic simulationSimulation is experimentation, testing scenarios, and making... More software, which is used for variety of applications such as simulation of a wide range of molecular and bulk materials with methods from classical potentials through Density Function Theory (DFT) and QM/MM to Hartree-Fock and Møller- Plesset 2nd order perturbation theory (MP2). A broad range of computational and simulations are possible by combining efficient algorithms with excellent parallel scalability to utilize modern high-performance computing architectures. CP2K provides a much broader range of capabilities, which includes the possibility of choosing the most adequate approach for a given problem and the flexibility of combining computational methods.
Introductory Tutorial: Submitting CP2K Simulations to Rescale Platform
In this example, we will simulate a fluid of mono-atomic argon particles that interact with a Lennard-Jones potential. The method to be used is molecular dynamics (MD) with periodic boundary conditions using CP2K.
This tutorial will introduce you to submitting CP2K jobs into the Rescale platform. An input file is already created on the local computer and we will show you how to start a Rescale job, submit, and transfer the results back to your computer.
Configuring Your Job
Starting Up Rescale
To start up the Rescale platform, go to the platform.rescale.com, log in using your credentials. From the main screen of the platform, click the +Create New Job button at the top left corner of your screen. Feel free to rename the job by clicking on the pencil icon next to the job name (“Untitled Job”) at the top of the page. Since the Rescale’s platform saves all of your jobs , it is recommended that you name it something specific so that you will be able to find it again later.
This is the first step of submitting your job.
Input File
Now you can upload the input file from your local computer or if you already have it on the cloud, you can upload it using the cloud storagea simple and scalable way to store, access, and share data o... More.
- For this tutorial you will want to upload the .inp file you downloaded at the start of the tutorial.
- Click Upload from the computer and select the file argon.inp from your computer.
On completion you will see your input file setup page look like that shown below:

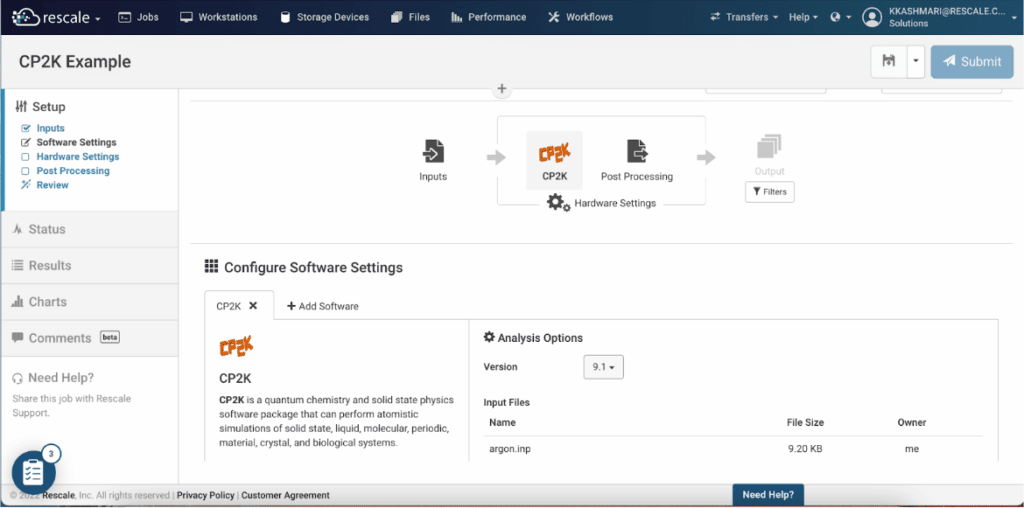
Software Settings
- Now we can configure our software package options on the “Software Settings” page. You can search for or directly select the tile for CP2K
- Next, the Analysis options must be set.
- The drop down selector allows you to choose your preferred version of the software.
- The input file in this tutorial has been tested with CP2K,9.1 , so select that option.
- Next you need to add the analysis execution command for your project. This command is specific for each software package and each input file being used. For this input file you will need to add the following:
mpirun -np $RESCALE_CORES_PER_SLOT cp2k.psmp -i argon.inp -o out_put.out- Since this is an open source software, there is no need to select any type of license.
The completed Software Setting should look like those in the images below:

Hardware Settings
Now we can select the type and number of cores to run on in the Hardware Settings page.
For a basic job, there are three hardware settings to edit: CoretypePre-configured and optimized architectures for different HPC... More, Number of Cores, and Walltime.
In this case, select 2 or more for the Number of Cores (1), 1 Hrs for the Walltime (2), and Emerald for the Corean individual processing unit within a multicore processor o... More Type. Rescale offers On-Demand Economy and On-Demand Priority core type options. You can find more information on these options here.
There is no need to specify any post processing options for this tutorial. To continue to Review, click Next from the Post Processing screen.
After reviewing your selections, your case should now be ready for batch submission at this point.
Review
The Review step shows you a summary of your job prior to submission.
- Click the blue Submit button in the top right corner on any of the job configuration pages or in the middle of the Review page.
- Alternatively, instead of submitting the job, you can elect to Save the problem setup to be run at some later time.

Status
Now you can monitor the progress of your job from the Status tab.
- You can monitor the status of your job and get information about your clusterA computing cluster consists of a set of loosely or tightly ... More in real-time. Here you can see the live-tailing of the output “process_out.log
- Because this analysis is entirely run in the cloud, feel free to close your browser window or shut down your computer. You can check on the progress at any time by logging into Rescale and clicking on the Jobs tab. You will receive an email notifying you when the job is completed.
- A guide on Monitoring Status on Rescale is found here.

- Once the job has completed its run, you can Download all of the output files from the Results page. You can also launch a Desktop and attach this job to perform post-processing.
- A guide on Managing your Job Results on Rescale is found here.

Configuring Your Desktop
Once the job is completed, follow these steps to view results on a Rescale Desktop:
Set up a Desktop session:
- Under the Workstations tab, select the Classic Desktop.
- From the main screen of the platform, click on the +Create New Desktop button at the top left corner of your screen. Feel free to rename the desktop by clicking on the pencil icon next to the desktop name (“Untitled Desktop”) at the top of the page. Since Rescale saves all of your desktops , it is recommended that you name it something specific so that you will be able to find it again later.
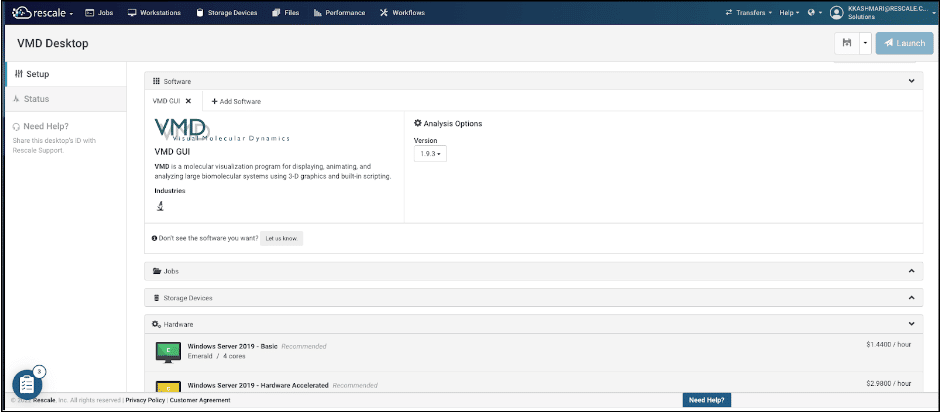
- In the next step, you can configure the software you need, for the purpose of this tutorial, VMD GUI is selected. under the Analysis option tab you can choose your preferred version which is considered 1.9.3 for the matter of this tutorial.
- Under the jobs section , you can attach the specific job that you want to use on the Rescale desktop.
- For the hardware it is recommended to use the Windows Servera server is a computer program that provides services to oth... More 2019 – Hardware Accelerated, which is well suited for the purpose of this tutorial.
- Now you can select Launch on the top right corner of the platform, and wait a couple of minutes for the desktop to connect.
Once the desktop is created, select the Connect button on the top right corner of the platform:
Now that we are connected to the system, we can launch the software by double clicking it and load our results. Any job that is attached to the desktop is accessible through a folder on the desktop.
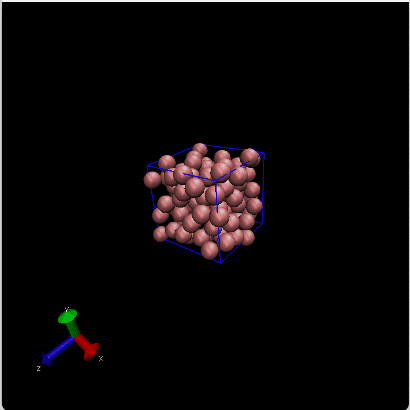
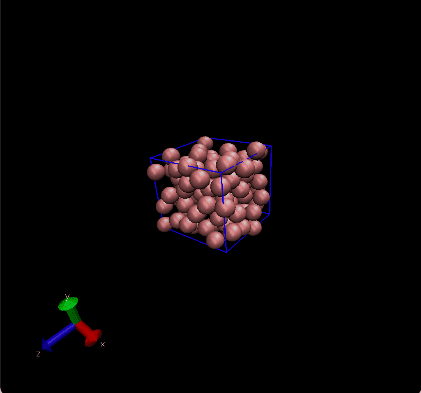
On the VMD top bar, select File and choose the New molecule. Find the .xyz file from the attached_job file and the Ar molecules will be shown on the screen. You can manipulate the graphics of the molecule by Go to Graphics → Representations and change the Drawing Method to VDW.

On the VMD shell type the following commands to define the unit cell of the system and wrap the atoms back to their original unit cell:
pbc set {17.158 17.158 17.158} -all
pbc box
pbc wrap -all
A snapshot of the molecular dynamics trajectory should approximately look like this: