
Run Hundreds of Free AI & HPC Applications in the NVIDIA NGC Catalog Accelerated on Rescale
Overview
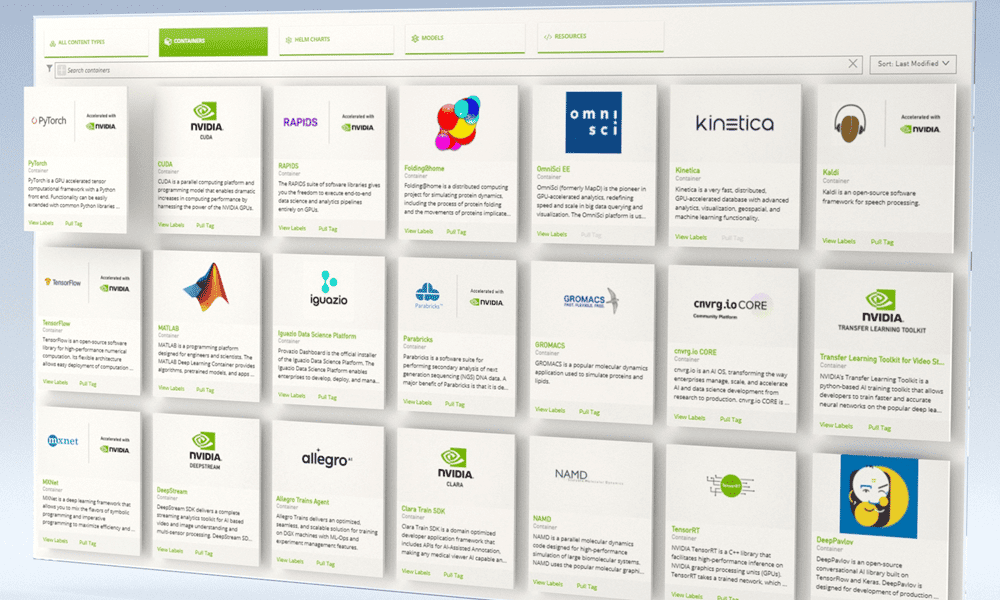
NVIDIA GPU Cloud (NCC) Catalog is a curated set of free and open-source GPU-optimized software for AI, HPCThe use of parallel processing for running advanced applicat... More and VisualizationVisualization is the representation of complex scientific or... More. The NGC Catalog consists of containerized applications, pre-trained models, Helm charts for Kubernetes deployments, and industry specific AI toolkits with software development kits (SDKs). Deploying NGC on Resale makes it easier for engineers and scientists to get started with a variety of new use cases for research and development on a single platform. Rescale automates the necessary hardware infrastructure, software, and workflow steps to make the latest computational tools more accessible and accelerated.
In this tutorial we are going to show you how to easily run NGC Catalog on Rescale. NGC can be run by either a batch job using the Rescale command line or interactively using Rescale Workstations.
Batch Job
Batch Job Video Tutorial
Sample Job and Results
You can access and directly launch the sample job by clicking the Import Job Setup button or view the results by clicking the Get Job Results button below.
In the above sample job, we run a python script building a TensorFlow machine learning modelA numerical, symbolic, or logical representation of a system... More with MNIST dataset. (Reference link).
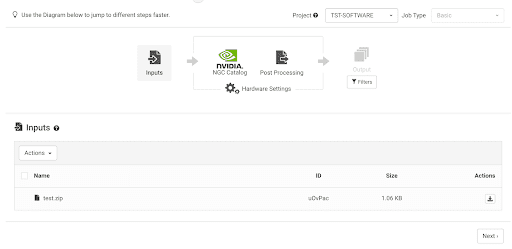
To submit the batch job, the first step is to choose Basic Job Type.
Inputs
Upload running scripts as input files. In the sample job, the python scripts are inside the compressed archive file test.zip.
Software
Next choose the NVIDIA NGC Catalog tile.
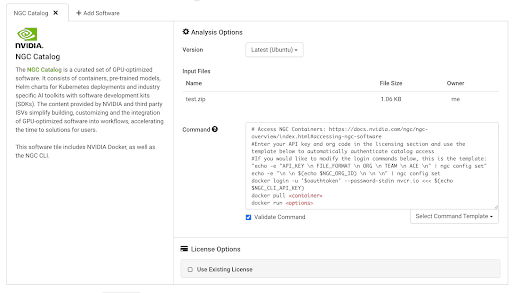
In the Command box, we provide the pre-populated command to login your NGC account and pull and run docker containers.
Users can pull containers from NGC Catalog. Here, we use the TensorFlow containerA package of self-sustaining application and operating syste... More as an example.
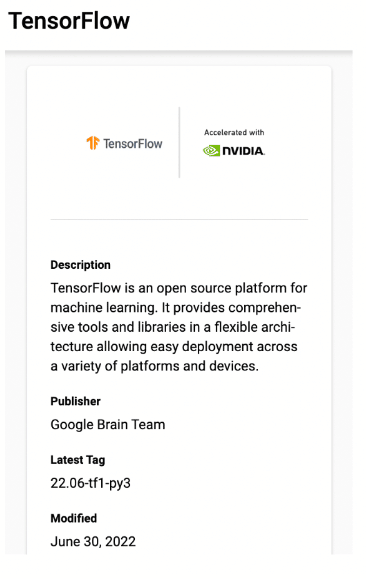
To pull the Tensorflow container, go to the NGC Catalog and click the Pull Tag to copy the docker pull cmd.
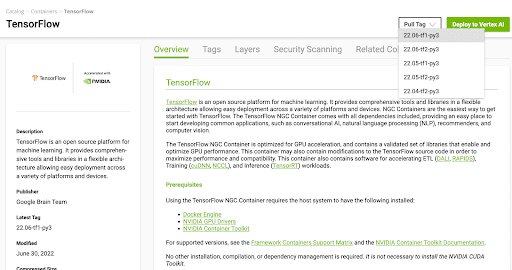
In the command box, paste the pull tag command and input the following commands to run the container, as in the sample job.
docker pull nvcr.io/nvidia/tensorflow:22.06-tf1-py3
docker run --gpus all -v ${PWD}/test:/test nvcr.io/nvidia/tensorflow:22.06-tf1-py3
bash -c 'cd /test;  python test.py'
Users can login their NGC Catalog account through Rescale platform.Check the Use Existing License box on the Rescale in the License Options. Input your API Key and Org Code here, as shown in the figure below.
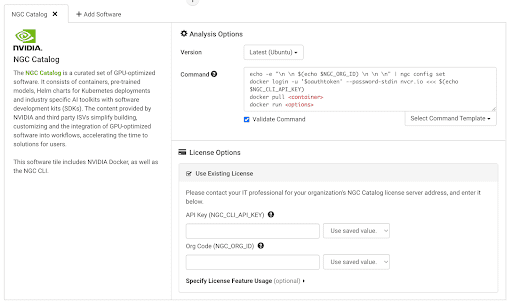
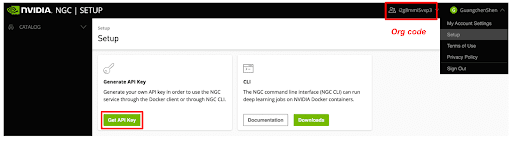
To get your API key and Org code, users need to login to your NGC Catalog account and generate your own API Key and Org code.
We provide a prepopulated command to login NGC account. Users just need to specify their container to be pulled and command to run in the command box.
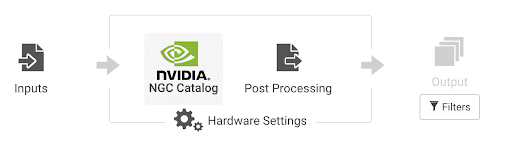
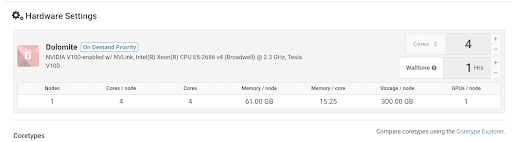
Hardware
We provided a variety of architectures for your job, like different CPU and GPU corean individual processing unit within a multicore processor o... More types. Here we choose 4 GPUsGPUs (Graphics Processing Units) are specialized electronic ... More for TensorFlow training.
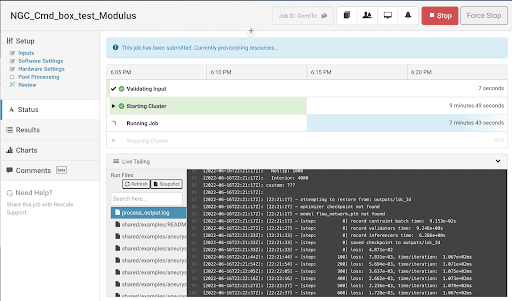
Status
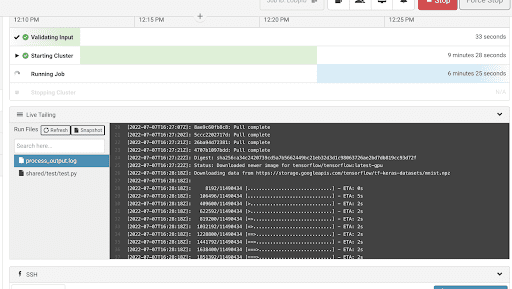
Click the Submit button to submit the job. Once the job is running, you can check process_output.log for the output.
Results
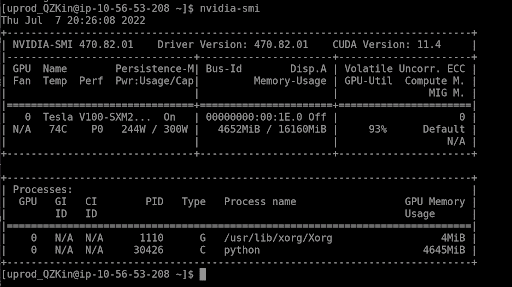
You can also open a terminal by clicking the Open in new window button to debug your script or run nvidia-smi to check the GPU usage and results while the job is running.

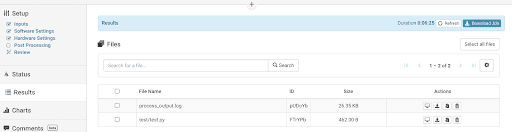
After the job is finished, all results data files will be saved to the Results tab. We can also open the file and check the results.
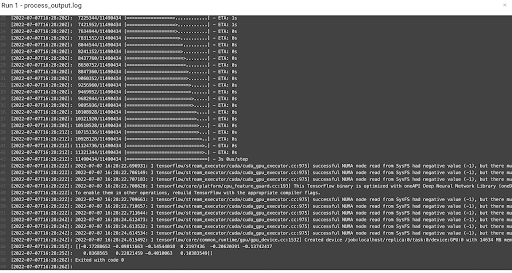
In the process_output.log file, we can see the NGC Catalog account is logged in successfully.

Here are the final output and results for the sample job.
Other use cases
NVIDIA Modulus
Input file is an example.zip download from Modulus official website. For this use case, the sample job can be loaded through this link and results here.

Cmd (pull latest version NVIDIA Modulus from NGC. Run lid driven cavity (LDC) flow case in the Modulus container with docker run ). For this container, NGC_API key is not required.
docker pull nvcr.io/nvidia/modulus/modulus:22.03.1
docker run --shm-size=1g --ulimit memlock=-1 --ulimit stack=67108864
--runtime nvidia -v ${PWD}/examples:/examples nvcr.io/nvidia/modulus/modulus:22.03.1
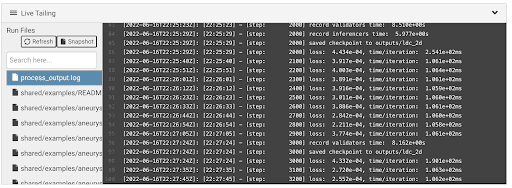
bash -c 'cd ldc;python ldc_2d.py'Monitor the process_output.log and check the outputs.
Workstations
Sample Workstation
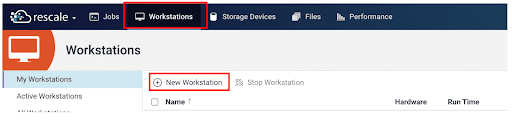
On the Rescale platform, users can also work interactively with Workstations. To submit a job, click the New workstationA workstation is a powerful computer system designed for pro... More button. Here is a sample job for reference.
Configuration
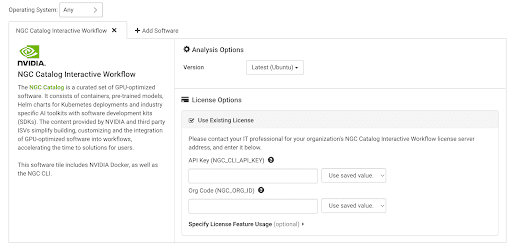
For the Input, upload the scripts you need to run. Next, choose NGC Catalog Interactive Workflow tile as Software. Unlike batch jobsBatch jobs are automated tasks submitted to a computing syst... More, we don’t need to specify a command script to run a Workstation; instead you will interact with it using a GUI.

Check the Use Existing License box in the License Options to login NGC account. Input your NGC API Key and Org Code here. The generation steps of the NGC API key and Hardware settings are the same as batch jobs and not repeated here.
Once the workstation is ready, click the Connect button on the top or Connect using local client (Download and install the NiceDCV client) to log into the Workstation.

In the Workstation, we can open a terminal window by clicking Activities on the top left corner and find the Terminal and launch it.

In the opened terminal, we can do interactive work. In a terminal window, run the following two lines cmd to login the NGC account.
$ echo -e "\n \n $(echo $NGC_ORG_ID) \n \n \n" | ngc config set
$ docker login -u '$oauthtoken' --password-stdin nvcr.io <<< $(echo $NGC_CLI_API_KEY)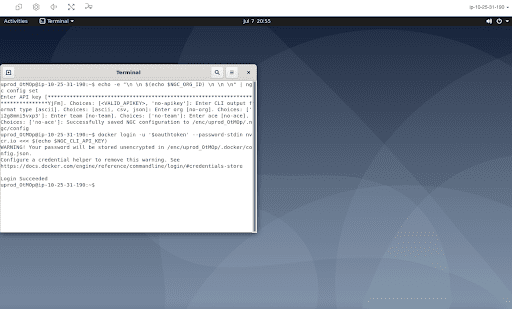
Then we are ready to pull containers from NGC Catalog.
Tensorflow Container
In this example, we pull the Tensorflow container:
$ docker pull nvcr.io/nvidia/tensorflow:22.06-tf1-py3Start the Tensorflow container by:
$ docker run --gpus all -it --rm -v ${PWD}/test:/test nvcr.io/nvidia/tensorflow:22.06-tf1-py3 bash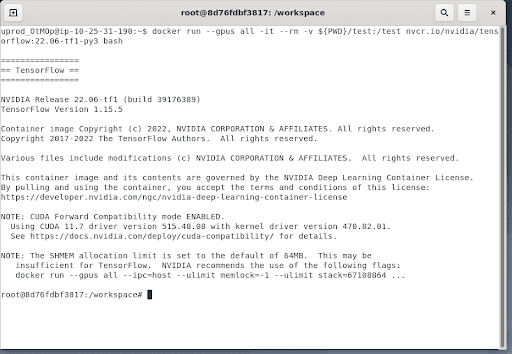
Run the following simple case in the container (Reference link):
$ python3
$ import tensorflow as tf
$ tf.enable_eager_execution()
$ mnist = tf.keras.datasets.mnist
$ (x_train, y_train), (x_test, y_test) = mnist.load_data()
$ x_train, x_test = x_train / 255.0, x_test / 255.0
$ model = tf.keras.models.Sequential([
  tf.keras.layers.Flatten(input_shape=(28, 28)),
  tf.keras.layers.Dense(128, activation='relu'),
  tf.keras.layers.Dropout(0.2),
  tf.keras.layers.Dense(10)
])
$ predictions = model(x_train[:1]).numpy()
$ predictions
If everything works well, we can check the predicted results output on the terminal.

Modulus Container
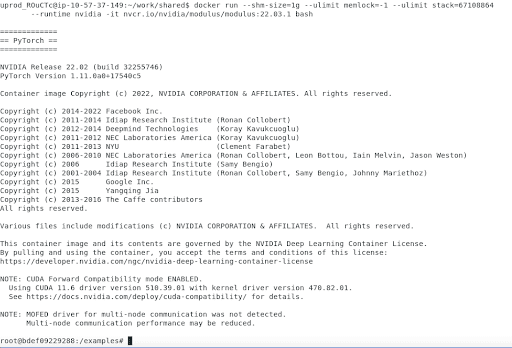
Pull the latest version of NVIDIA Modulus from NGC.
$ docker pull nvcr.io/nvidia/modulus/modulus:22.03.1Start the Modulus container by the directory:
$ docker run --shm-size=1g --ulimit memlock=-1 --ulimit stack=67108864
--runtime nvidia -it -v ${PWD}/examples:/examples
nvcr.io/nvidia/modulus/modulus:22.03.1 bash
Successfully load the latest Modulus.
Run the lid driven cavity case in the container by:
$ cd ldc
$ python ldc_2d.py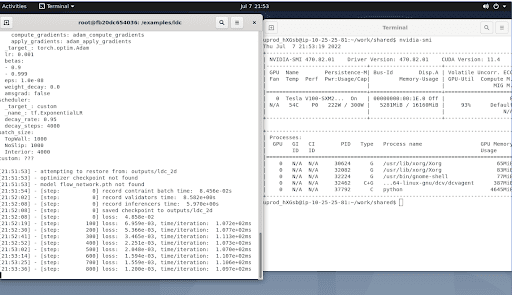
As the above simulationSimulation is experimentation, testing scenarios, and making... More is running, we can pull the Paraview GUI container for visualization purposes.
ParaView GUI container
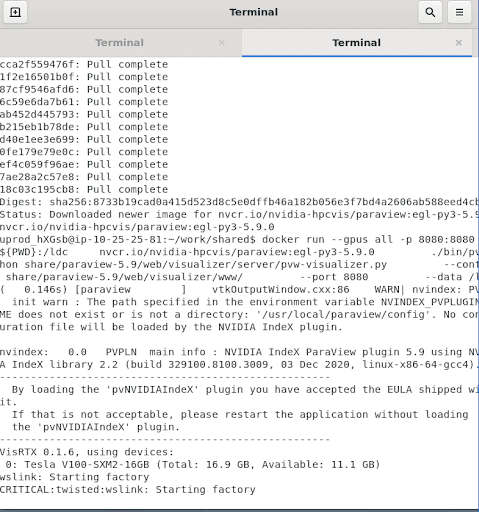
Open a new terminal window and pull the paraview docker container from NGC.
$ docker pull nvcr.io/nvidia-hpcvis/paraview:egl-py3-5.9.0
$ docker run --gpus all -p 8080:8080 -v ${PWD}:/ldc
nvcr.io/nvidia-hpcvis/paraview:egl-py3-5.9.0         ./bin/pvpython
share/paraview-5.9/web/visualizer/server/pvw-visualizer.py         --content
share/paraview-5.9/web/visualizer/www/         --port 8080         --data /ldc
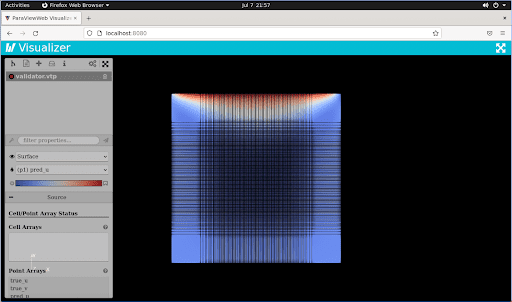
Open the ParaView in DCV web browser (like Firefox web) by https://localhost:8080/
Then you can open the GUI and visualization the result files.
Conclusion
We hope that this tutorial helped you get started with running NGC Catalog on Rescale. As you can see, you can pull and run all the containers available on NGC Catalog with multiple GPUs through a Rescale batch job. Or you can run and launch containers interactively on a Rescale Workstation, for developing code, monitoring training and post processing the results with multiple GPUs. Our platform provides various GPU architectures for you to choose from and all the assets you need to build your AI workflow. For additional information you can visit the NVIDIA documentation page for NGC here.