
組織向けのクラウド財務管理
概要
組織管理者は、組織に属するすべてのワークスペースの財務と予算を管理できます。 組織管理 ポータル。 管理者は、次の方法でこれらの設定にアクセスできます。 財務 ポータルのタブ。
組織全体の財務を表示する
管理者には、 財務 組織のポータルにログインするときにタブをクリックします。 このタブでは、次のページにアクセスできます。
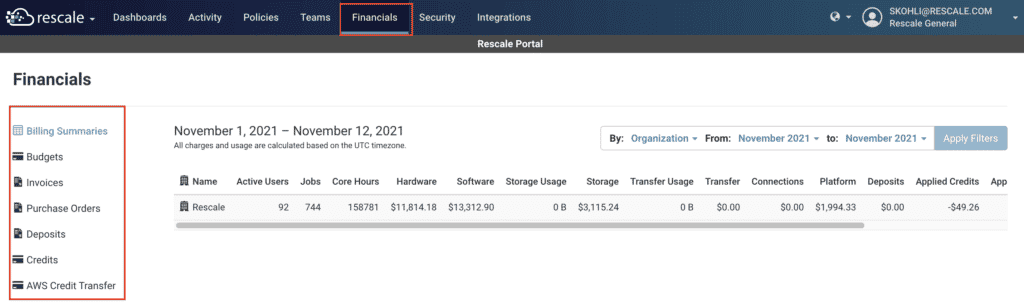
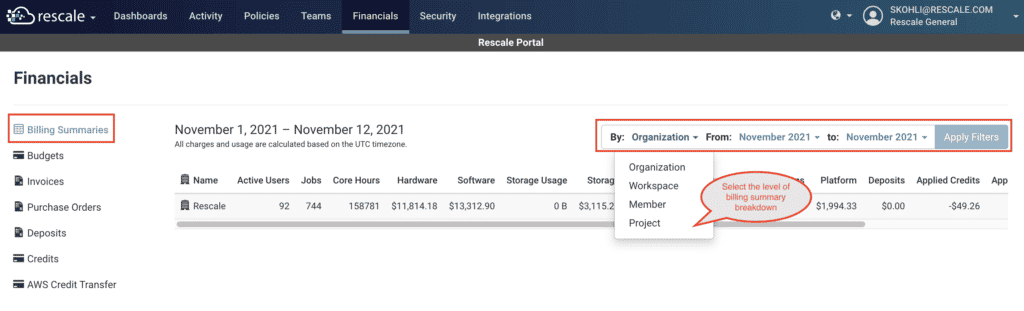
請求の概要
ソフトウェア設定ページで、下図のように 請求の概要 ページで、管理者は組織全体の請求概要を表示できるようになります。 ページの右上にあるフィルタから、確認したい料金概要のレベルを選択し、概要を実行する時間範囲を指定できます。
管理者は、料金概要の横にあるドロップダウンを選択して、料金概要をフィルタリングできます。 By フィルターには次のオプションが含まれます。
- 組織: 組織の請求 CSV をダウンロードするオプションを含む XNUMX つの組織レベルの概要を表示します。
- ワークスペースを使用すると、リスケールの顧客は専用のチームを作成できます... その他: ワークスペースの概要のリストが表示され、ワークスペースの請求 CSV をダウンロードするオプションが表示されます。
- メンバー: メンバーの概要のリストが表示され、メンバーの請求 CSV をダウンロードするオプションが表示されます。
- プロジェクト: プロジェクトの概要のリストが表示され、プロジェクトの請求 CSV をダウンロードするオプションが表示されます。
予算
組織管理者は、「予算」ページからワークスペース、プロジェクト、またはメンバーレベルの予算を作成できます。
ワークスペースの予算の作成
ワークスペースの予算は、ワークスペースが費やすことができる合計金額を制御します。 この予算は、ワークスペース内のすべてのメンバーに適用されます。
組織管理者は、組織のポータルにログインし、次のリンクに移動することで、ワークスペース レベルの予算を作成および/または変更できます。 財務 > 予算.
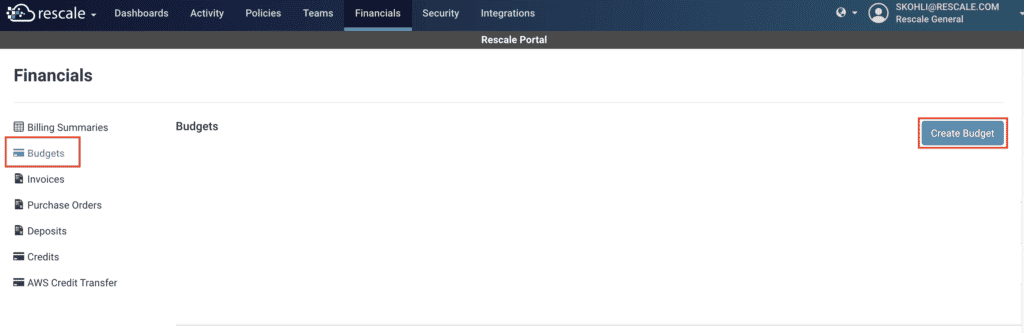
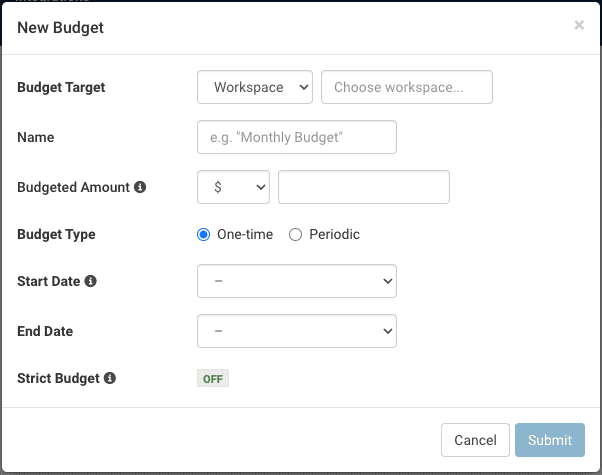
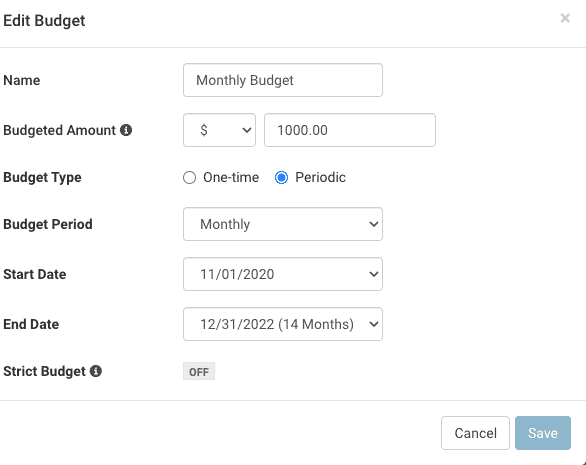
ソフトウェア設定ページで、下図のように 予算 ページで、 予算を作成 ボタン。 A 新しい予算 ウィンドウが開き、次のオプションを指定できます。
- 予算目標: を選択 オプションを選択します。
- 次のフィールドを使用する 、予算を作成する組織内のワークスペースを選択します。 XNUMX つの予算に対して指定できるワークスペースは XNUMX つだけであることに注意してください。
- 名前 : 予算の名前を入力します。
- 予算額: このワークスペースが使用できる金額を入力します
- 予算タイプ: 設定した期間に予算を更新するかどうかを指定します
- XNUMX 回限りの予算では、日付の範囲を固定できます。 この予算は終了日以降は更新されません
- 定期予算は、毎月、四半期、または毎年更新するように設定できます。
- 開始日: この予算を有効にする月を指定します。
- 終了日: この予算が終了する月を指定します。
- 厳しい予算 (オプション): このオプションを使用すると、ユーザーは予算にハード制限を適用できます。
- Strict Budget が ON に設定されている場合、予算を超過すると、アクティブに実行中のジョブまたはクラスターは直ちに終了されます。 追加のジョブが送信されると、予算が追加のジョブをサポートできるようになるまでキューに入れられます。
- Strict Budget が OFF に設定されている場合、予算を超過すると、アクティブに実行中のジョブまたはクラスターが完了するまで実行されます。 追加のジョブが送信されると、予算が追加のジョブをサポートできるようになるまでキューに入れられます。
ワークスペースの予算の変更
組織管理者は、ワークスペース管理者が作成したワークスペース レベルの予算を変更できます。ただし、組織管理者が作成したワークスペースの予算は、ワークスペース管理者が変更することはできません。 ワークスペース管理者は、自分が作成し、所属するワークスペース予算のみを変更できることに注意してください。 アプリ環境に合わせて ワークスペースに対して、組織管理者はワークスペースの予算を変更できます。
組織管理者は、次の場所にアクセスできます。 財務 > 予算 セクションを参照して、既存のすべての予算のリストを表示します。
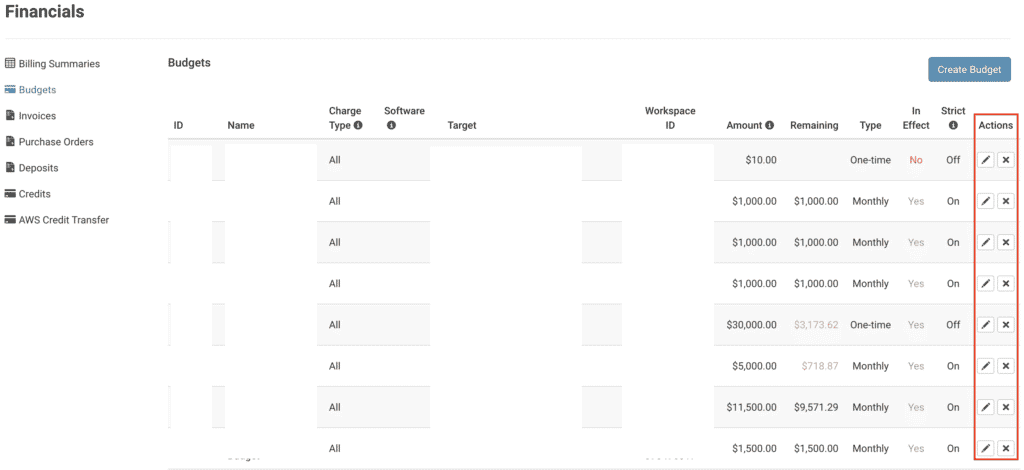
ノーザンダイバー社の 右端の列で、管理者は次のことを選択できます。
- 削除: [X]をクリックします。 予算を削除するアイコン
- 編集: 鉛筆アイコンをクリックして予算を編集します。 アン 予算の編集 画面が開き、次のオプションを編集できます。
- 名前
- 予算額
- 予算タイプ
- 開始日
- 終了日
- 厳しい予算
変更を加えたら、をクリックします Save 予算を更新します。
プロジェクト予算
プロジェクトの予算は、プロジェクトが費やすことができる合計金額を制御します。 この予算は、プロジェクトに属するジョブのすべての料金に適用されます。 組織管理者が作成したプロジェクト予算は、ワークスペース管理者が編集でき、その逆も可能です。
会員の予算
メンバーの予算は、メンバーが使用できる合計金額を制御します。 この予算は、そのメンバーのすべての料金に適用されます。 組織管理者が作成したメンバー予算は、ワークスペース管理者が編集でき、その逆も可能です。
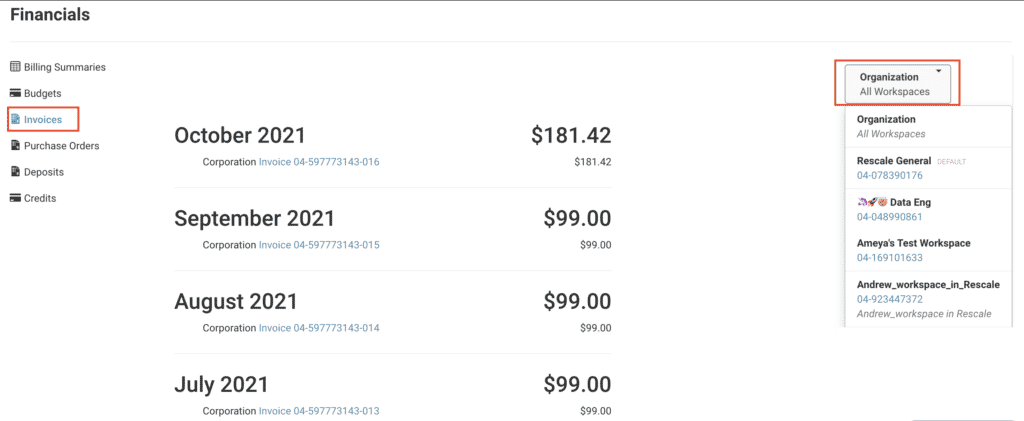
請求書
ソフトウェア設定ページで、下図のように 請求書 ページでは、組織管理者は組織に属するすべてのワークスペースの請求書を表示できます。 組織管理者がこのページにアクセスすると、デフォルトですべてのワークスペースの請求書が表示されます。 ただし、ページの右側にあるドロップダウンを使用して、特定のワークスペースをフィルタリングできます。
月に複数の請求書がある場合、すべての請求書がその月の下にリストされます。
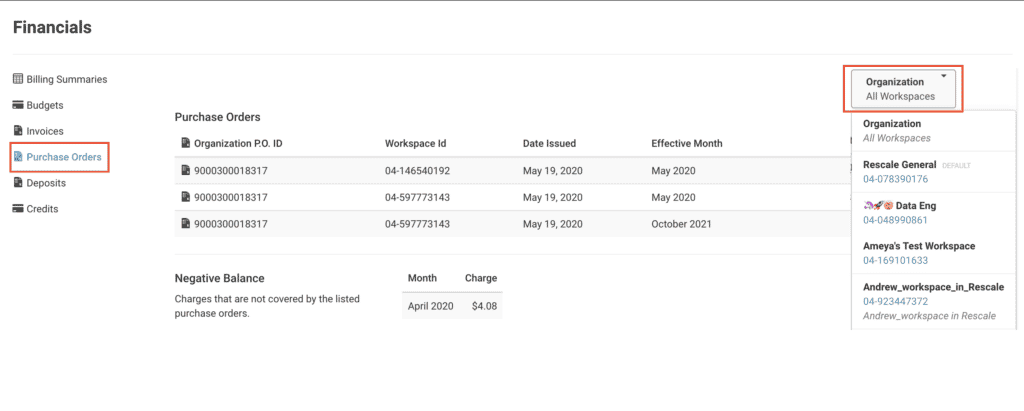
購入注文
ソフトウェア設定ページで、下図のように 購入注文 このページでは、組織管理者は、組織に属するすべてのワークスペースの発注書を表示できます。 組織管理者がこのページにアクセスすると、デフォルトですべてのワークスペースの注文書がワークスペース ID とともに表示されます。 ただし、ページの右側にある特定のワークスペース ドロップダウンをフィルタリングできます。
マイナス残高 このセクションには、組織全体のすべてのマイナス残高の合計が月ごとに表示されます。 発注書でカバーされていない料金は、マイナスの残高として表示されます。
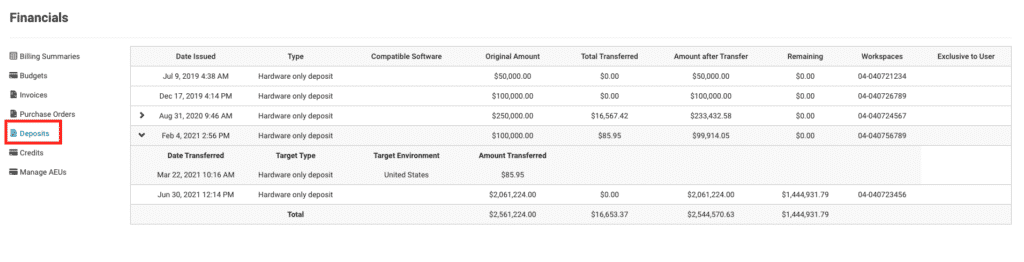
ソフトウェア設定ページで、下図のように このページでは、組織管理者は、組織に属するすべてのワークスペースのデポジットを表示できます。 特定のデポジットについて、管理者は以下を表示できます。
- 日付発行: デポジットが発行された日付。
- タイプ: デポジットの種類。
- 互換性のあるソフトウェア (オプション): デポジットと互換性のあるソフトウェアを表示します。 特定のソフトウェアに関連付けられたソフトウェアのデポジットにのみ使用されます。
- 元の金額: 元の入金額。
- 転送総額: 他のワークスペースに送金されたデポジットの金額
- 送金を伴う入金の場合、入金行の横のドロップダウンに次の内容が表示されます。
- 転送日: 転送日。
- ターゲットタイプ: デポジットの種類。
- 対象環境: 対象となる Rescale 環境。
- 転送された金額: 送金されたデポジットの金額。
- 送金を伴う入金の場合、入金行の横のドロップダウンに次の内容が表示されます。
- 振込後の金額:保証金の一部を移管した後の残高です。 これにはデポジットの使用量は考慮されていないことに注意してください。
- 残り: 送金や利用を考慮した残高です。
- : このデポジットの対象となるワークスペース ID。
- ユーザー限定 (オプション): デポジットがユーザー専用かどうかをユーザーに表示します。
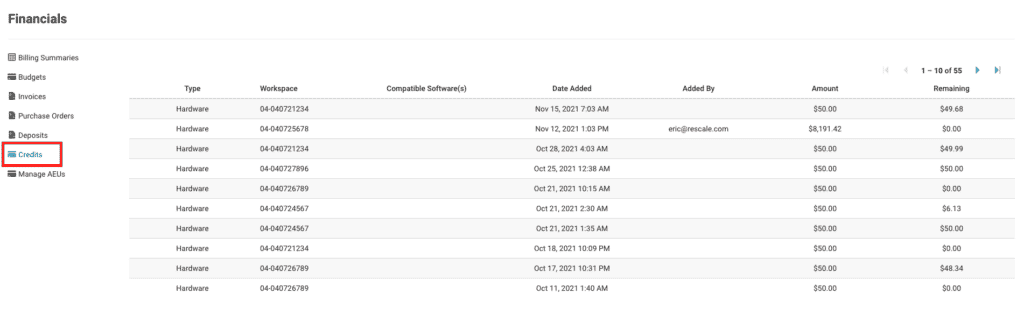
Applied Deposits
ソフトウェア設定ページで、下図のように Applied Deposits このページでは、組織管理者は、組織に属するすべてのワークスペースのクレジットを表示できます。 特定のクレジットについて、管理者は以下を表示できます。
- タイプ: 発行されたクレジットの種類。
- : このクレジットの対象となるワークスペース ID。
- 互換性のあるソフトウェア: クレジットと互換性のあるソフトウェアを表示します。 特定のソフトウェアに関連付けられたソフトウェア クレジットにのみ使用されます。 ソフトウェア クレジットを発行する場合は、クレジットが適用されるソフトウェアを指定する必要があります。
- 追加された日付: クレジットが発行された日付。
- によって追加: クレジットを発行した Rescale ユーザー。
- 単位: 発行されたクレジットの量。
- 残り: クレジットの残量。
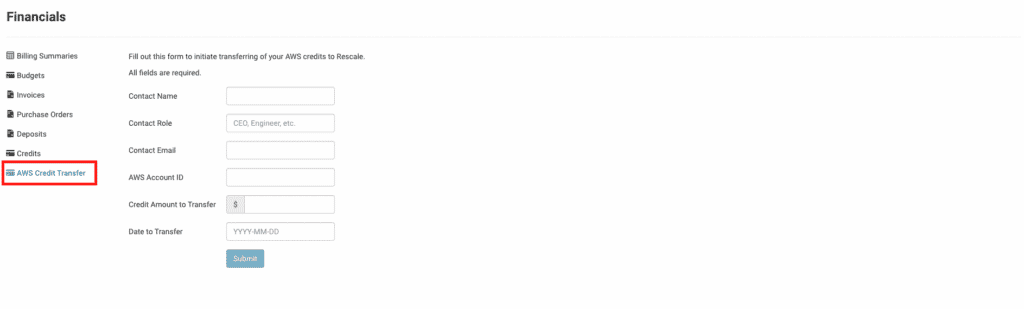
AWS クレジット転送
AWS クレジット転送を使用すると、組織管理者は、Rescale プラットフォーム経由で AWS インフラストラクチャを使用するために、AWS クレジットを Rescale に転送するようリクエストできます。
この機能は、AWS クレジットを使用する組織のみが利用できることに注意してください。
よくあるご質問
Q. デポジットと予算の違いは何ですか?
デポジットは、購入者が販売者に対して負担する料金を解決するために、購入者が販売者 (Rescale、ISV、またはパートナー) に対して行う金銭的な約束です。 デポジットは、プラットフォームで発生したコンピューティング、ストレージ、転送などの料金を「支払う」ために使用できます。
予算は、ユーザー、ワークスペース、またはプロジェクトの支出制限を制限する Rescale プラットフォームのメカニズムです。 予算は料金を決済するために使用されるのではなく、特定のエンティティによって、または特定のエンティティの下で生成される料金の総額を制御するために使用されます。