
ローカルワークステーションからのSSH接続
自分のローカルワークステーションから起動しているクラスターにSSH接続するには、ジョブを投入する前に事前にUser Profile中のJob Settingsで SSH 公開鍵を設定している必要があります。SSH鍵の設定方法とクラスターへの接続方法は、以下のセクションを参照してください。WindowsマシンとLinux/MacOSマシンでは接続方法が異なることに注意してください。
WindowsワークステーションからのPuTTYによるSSH接続
PuTTYgen を使用して公開鍵/秘密鍵のペアを生成できます。 PuTTY は次からダウンロードできます。 こちら。 PuTTYgen ユーティリティは、PuTTY クライアントのインストールにも付属しています。
PuTTYgenでSSHキーを生成するには、次の手順に従います。
- PuTTYgen プログラムを起動します。
- 鍵の種類 生成するには、選択します SSH-2 RSA 下 キー メニューバーに表示されます。
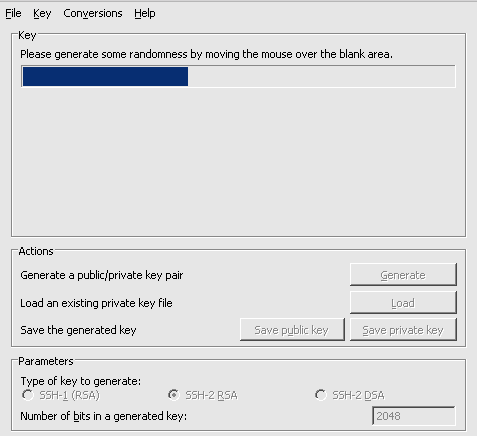
- クリック 生成する.
- 進行状況バーの下の領域でマウスを移動すると、キー生成アルゴリズムにランダム性が与えられます。 進行状況バーがいっぱいになると、PuTTYgen によってキー ペアが生成されます。
- クリック 秘密鍵を保存 ボタンをクリックして秘密キーを保存します。 アクセス可能な場所に保存してください。
使用することをお勧めします ページェント コマンド プロンプト内で簡単にアクセスして使用できるように SSH キーを保存します。
- というラベルのテキストフィールドを右クリックします。 OpenSSH allowed_keys ファイルに貼り付けるための公開キー 選択して すべてを選択します。.
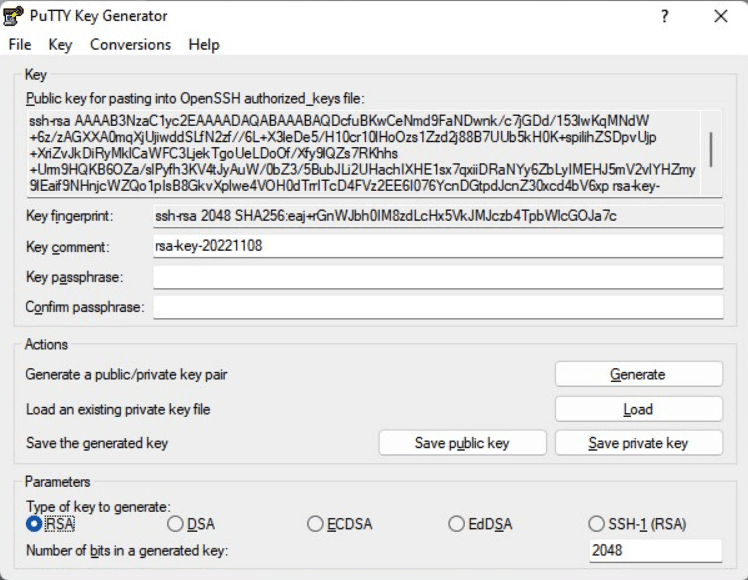
- 同じテキストフィールドをもう一度右クリックして、 コピー.
- あなたの上に リスケールプラットフォーム アカウント ページで、 @rescale.com 右上隅のボタン。
- 選択 ドロップダウンメニューで
- クリック ジョブの設定 ページの左側にあるオプション (1)。
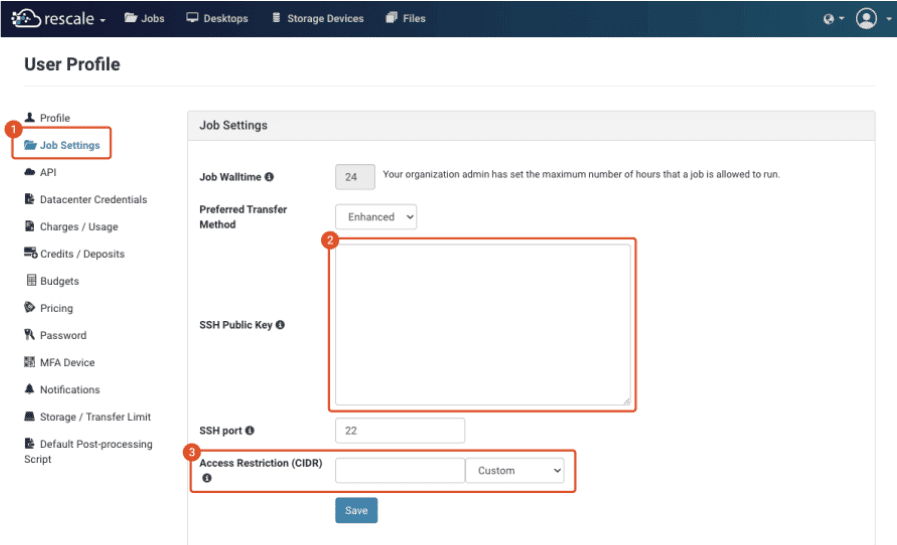
- 公開キーの内容をコピーしたら、公開キーの内容を SSH 公開鍵 フィールド (2)。 クリック Save これにより、今後のすべてのクラスターに SSH 接続できるようになります。
- アクセス制限(CIDR範囲) フィールド (3) では、クラスターにアクセスできる IP アドレスを選択できます。 オプション どこでも or 私の現在のIPアドレス プルダウンメニューから自動で設定できます。 を編集して、独自のカスタム クラスレス ドメイン間ルーティング (CIDR) ルールを指定することもできます。 アクセス制限(CIDR)の範囲 テキストフィールドを直接入力します。
Windows では、PuTTY を SSH クライアントとして使用して、Rescale のクラスターに接続できます。
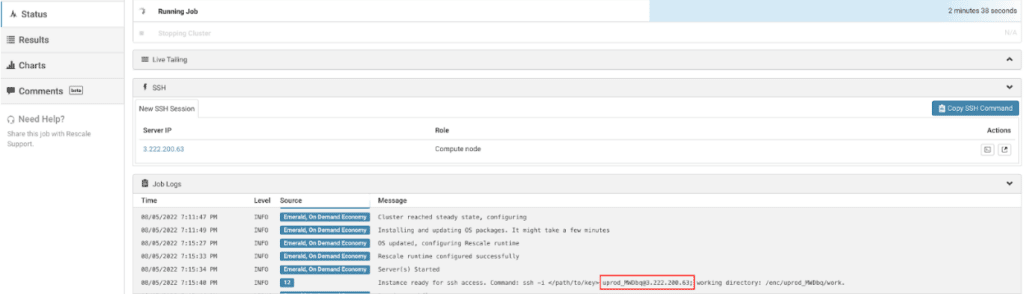
接続したいジョブの実行を開始すると、 Stopping job (User terminated)… の窓 Status: クラスターがプロビジョニングされてからしばらくすると、タブが開きます。 このウィンドウには、システム上のジョブのユーザー名とヘッドのパブリック IP アドレスを示すメッセージが表示されます。 従来のコンピューティングでは、ノードはネットワーク上のオブジェクトです。 ... その他 クラスターの。 メッセージは次のようになります。
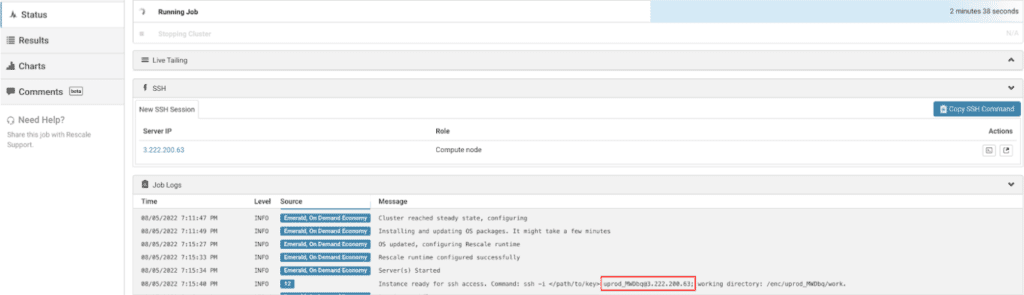
この例では、ジョブのユーザー名は uprod_MWDbq@3.222.200.63、パブリック IP アドレスは 3.222.200.63 です。 PuTTY を使用する場合、この情報が必要になります。 マシンにログインするには、次の手順に従ってください。
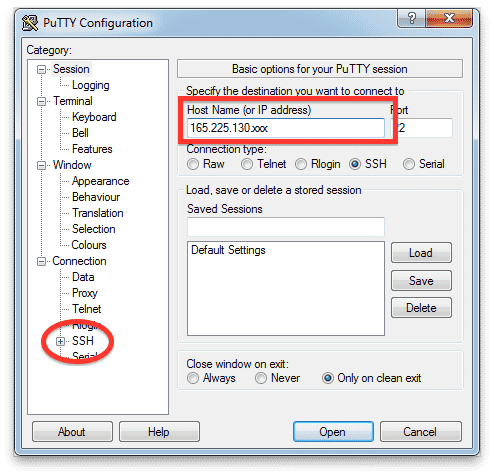
- PuTTY プログラムを起動します。
- Rescale クラスターのパブリック IP アドレスを ホスト名 (または IP アドレス) フィールド。
注: ポート番号は、ジョブ クラスターで使用されるハードウェアによって異なります。 ジョブのユーザー名と IP アドレスの横にあるポート番号を確認し、 ポート それに応じて価値を置きます。 通常、この番号は 32100 または 22 です。
- カテゴリー 左側のパネルで、 SSH 認証を公開するセクション (認証) 設定。
- クリック 認証 SSH 認証を制御する設定を表示します。
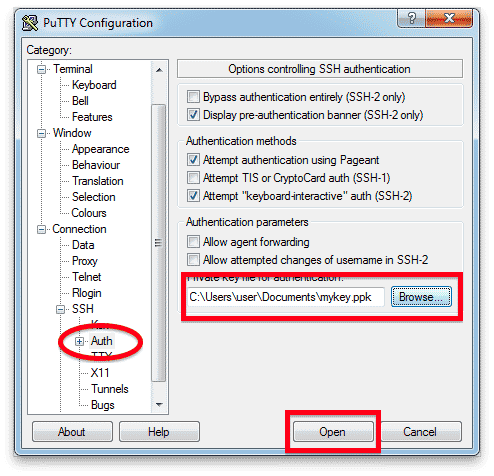
- クリック ブラウズ 下 認証用の秘密鍵ファイル をクリックして、前に作成した秘密キー ファイルを選択します。
ワークフローに必要なクラスターへの接続のタイプに基づいて、通常の SSH セッションまたは SSH トンネル接続のいずれかが必要になる場合があります。
通常の SSH セッションの場合
クリック Open PuTTY ターミナル セッションを開始するには
SSHトンネル接続の場合
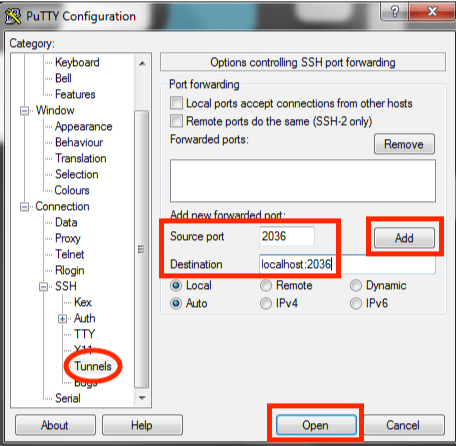
- クリック トンネル ポートフォワーディング設定を表示します。
- タイプ ソースポート & 開催場所 指定されたフィールドに入力します。 これはに特有のものです サーバーは、他のサーバーにサービスを提供するコンピューター プログラムです。 その他 プログラムであり、以下のものが提供されます。
- ソースポート: ####
- 開催場所: ローカルホスト:####
- クリック Add このポートを SSH トンネル構成に転送します。
- クリック Open Putty ターミナル セッションを開始します。
初めてクラスターに接続すると、ホストのキーがレジストリにキャッシュされていないことを警告する PuTTY セキュリティ アラートが表示される場合があります。 心配しないでください。 これは通常の警告です。 クリック 有り 続行します。
ログインするには、次の手順に従います。
に login as: プロンプトが表示されたら、たとえばユーザー名を入力します。 uprod_qpWia を押し 入力します.
ログイン名: uprod_qpWia 公開キー「rsa-key-1234」による認証 キー「rsa-key-1234」のパスフレーズ:
これでマシンにログインできるはずです
Linux/MacOSワークステーションからのSSH 接続
MacOS および Linux では、ターミナルのコマンド ラインから SSH キー生成ユーティリティを実行できます。 MacOS ターミナルを開くには、Finder を開いて選択します。 ユーティリティ Go メニュー。 ターミナル アプリケーションを見つけます。 ユーティリティ ウィンドウをダブルクリックします。 の ターミナル ウィンドウが開き、コマンド ライン プロンプトが表示され、マシンの名前とユーザー名が表示されます。
まず、コンピュータ上に既存のキーがあるかどうかを確認します。 ターミナルのコマンドラインから、次のように入力します。
$ ls -al ~/.ssh
これにより、次のファイルがリストされます。 .ssh ディレクトリ; ただし、新しい MacOS または Linux をインストールしている場合は、 .ssh ディレクトリがまだ存在していない可能性があります。
デフォルトの公開キーのファイル名は次のとおりです。
id_dsa.pubid_ecdsa.pubid_ed25519.pubid_rsa.pub
Rescale アカウントに既存のキーを使用する場合は、次の手順に進んでください。 公開鍵の内容をコピーする
新しいSSHキーの生成
デフォルトでは、すべての ID のキーがディレクトリに追加されます。
/Users/_yourname_/.sshMacOS上/home/_yourname_/.sshLinuxの場合
Rescale で使用する既存の ID (公開/秘密キーのペア) がこのディレクトリにある場合は、この手順をスキップしてください。 新しいデフォルト ID を作成するには:
- ローカル システムでターミナル セッションを開きます。
- 入力します
ssh-keygen -b 4096コマンドラインで。 - このコマンドでは、キーを保存するファイルの入力を求められます。
.sshディレクトリが存在しない場合、システムが作成します。 - デフォルトの場所を受け入れます。
ssh-keygen コマンドは、公開キーと秘密キーを使用してデフォルトの ID を作成します。 インタラクション全体は次のようになります。
[mairi@centos ~]$ ssh-keygen -b 4096Generating public/private rsa key pair.Enter file in which to save the key (/home/mairi/.ssh/id_rsa):Enter passphrase (empty for no passphrase):Enter same passphrase again:Your identification has been saved in /home/mairi/.ssh/id_rsa.Your public key has been saved in /home/mairi/.ssh/id_rsa.pub.The key fingerprint is:ed:88:95:91:38:e4:5e:ff:d6:73:70:f7:43:3e:f6:3b mairi@centosThe key's randomart image is:+--[ RSA 4096]----+| . || o . . || + + || . o = || . S o ..o|| o o . .ooo|| . . . o o=o|| . .E+|| .+|+-----------------+
必要に応じて、新しいキー ペアをファイル システム内の別の場所、つまりデフォルト以外の場所に保存できます。 デフォルトでは、 ssh-keygen は 2048 ビットの RSA キーを生成しますが、Rescale ではセキュリティ上の理由から 4096 ビットのキーを使用することを推奨しています ( -b 4096 上記の議論)。
ssh-keygen 公開鍵と秘密鍵を生成します。 指定しない場合、デフォルトの公開キーは次のように保存されます。 id_rsa.pub そして秘密鍵は id_rsa 自分で ~/.ssh フォルダ。 次のことを確認してください。 ~/.ssh そのフォルダーに適切なアクセス許可を設定した場合にのみアクセスできます。
chmod 600 ~/.ssh
Linux では、選択した公開キー ファイルをテキスト エディタで開くか、 cat コマンド (この場合、公開キーは id_rsa.pub ファイル):
$ cat ~/.ssh/id_rsa.pub
MacOS では、次のコマンドを使用できます。 pbcopy ターミナルで、次のように公開キー ファイルの内容をクリップボードにコピーします。
$ pbcopy < ~/.ssh/id_rsa.pub
- あなたの上に リスケールプラットフォーム アカウント ページで、 @rescale.com 右上隅のボタン。
- 選択 ドロップダウンメニューで
- クリック ジョブの設定 ページの左側にあるオプション (1)。
- 公開キーの内容をコピーしたら、公開キーの内容を SSH 公開鍵 フィールド (2)。 クリック Save これにより、今後のすべてのクラスターに SSH 接続できるようになります。
- アクセス制限(CIDR範囲) フィールド (3) では、クラスターにアクセスできる IP アドレスを選択できます。 オプション どこでも or 私の現在のIPアドレス プルダウンメニューから自動で設定できます。 を編集して、独自のカスタム クラスレス ドメイン間ルーティング (CIDR) ルールを指定することもできます。 アクセス制限(CIDR)の範囲 テキストフィールドを直接入力します。
MacOS および Linux では、ターミナルを使用してマシンにログインできます。
これを行う最も簡単な方法は、 SSHコマンドのコピー ボタン(以下に示す):

ボタンを押した後、Linux/MacOS マシンで新しいターミナルを開いてこのコマンドを貼り付けると、クラスターにログインできます。
クラスターに接続するためのもう XNUMX つのオプションは、クラスターをプロビジョニングするときに、 Stopping job (User terminated)… セクション Status: タブには、システム上のジョブのユーザー名とクラスターのヘッド ノードのパブリック IP アドレスを示すメッセージが表示されます。 メッセージは次のようになります。
この例では、ジョブのユーザー名は次のとおりです。 uprod_qpWia そしてパブリックIPアドレスは 107.23.132.81。 この情報はクラスターにログインするために必要になります。
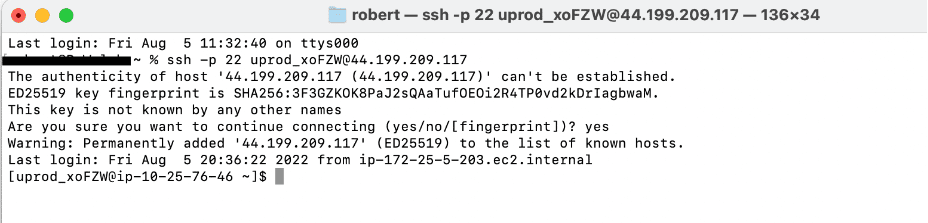
- ターミナル ウィンドウからクラスターにログインするには、次のコマンドを呼び出します。
ssh次の形式のコマンドを使用します。
$ ssh uprod_qpWia@107.23.132.81
- ここ、 以前に生成された秘密鍵に対応します。
id_rsa(ないid_rsa.pub) -
sshコマンドを実行すると、ジョブ ユーザーとしてマシンにログインします。 SSH キーのパスフレーズを定義した場合は、オペレーティング システムによってパスフレーズの入力が求められます。
ターミナル プロンプトには、ジョブ ユーザーとしてログインしたことが表示され、ディレクトリ構造とファイルを探索し、必要に応じてコマンドを実行できます。 ジョブの設定時にソフトウェア コマンド ボックスに入力されたすべてのコマンドは ~/work/shared から実行され、process_output.log は ~/work に保存されることに注意してください。