
Bring Your Own Software With Rescale Software Publisher (Beta) – Getting Started Guide
Overview
Rescale is happy to provide Rescale Software Publisher in Beta Release. We welcome customers to try out this new capability and provide us feedback. Please contact your Rescale account team for details if you are interested.
Rescale Software Publisher is a new product feature that allows organizations to bring their own software to the Rescale cloud platform. It provides customers the following benefits:
- On-demand publishing to Rescale’s software catalog- fast without waiting on other teams to process your request
- You can now bring a wide variety of software to use in Rescale- custom, proprietary, commercial, open source, and personal utilities you may have developed.
- Easy to use and does not require advanced IT skills, coding, or special cloud administrator access to infrastructure
- Centralized visibility, access, and administration for all your HPCThe use of parallel processing for running advanced applicat... More software applications and packages
The following new features and capabilities are highlighted for Rescale Software Publisher:
- The Sandbox is a new concept introduced by Publisher, a temporary working environment to install and test software prior to publishing.
- The command line interface extends the existing
rescale-cli, with a new ‘spub’ option to perform publishing commands. - There are also new visibility settings when publishing software, that are described later in this document. Basically when you are ready to share your published software with others, you can share it at the workspaceWorkspaces allow rescale customers to create dedicated teams... More level, or at the organization level which would be visible to all workspaces.
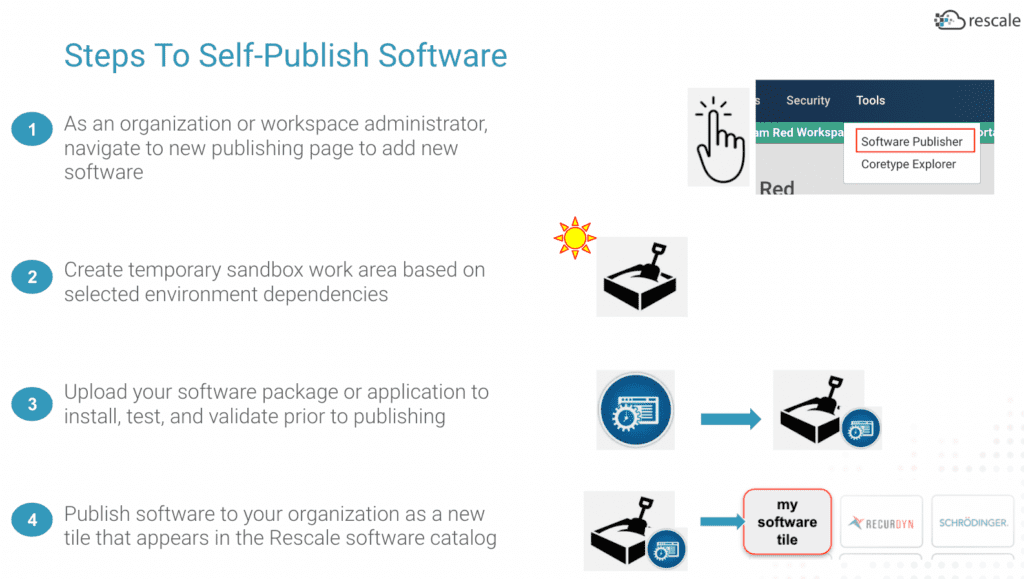
The diagram below shows an overview of the publishing process:
There are known limitations and missing functionality in the current Beta version of Rescale Software Publisher. These are outlined at the end of this document.
Pre-requisites:
- The user you log in as, will need admin role privileges- either at the Workspace level or Organizational level.
- Organizational admins can publish and set visibility within any workspace within their organization
- Workspace admins can only publish and set visibility to workspaces they manage
- You will need someone from Rescale to enable your company / organization to have access to Rescale Software Publisher. This is part of the on-boarding process for new Beta customer users. Reach out to your Rescale team for details.
- Currently in Beta, only software that can run on Linux OS can be published. Windows OS is not supported for self-publishing.
UI access:
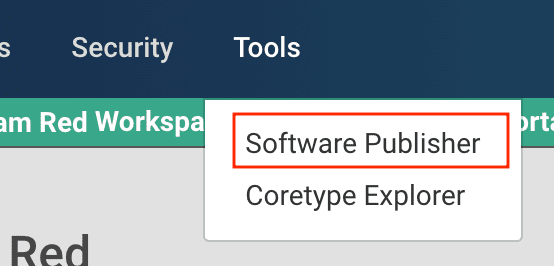
As an admin user, go to the admin portal and you will see a “Tools” menu at the top. Under there, select “Software Publisher”.
If you do not see this new Tools menu from the admin portal, your Rescale user account may not have the necessary permissions configured.
You will see a list of local published software. Or it may be empty. The early release version does not currently have an option to search or sort columns. To find your software in a long list, use the browser find / search option on the page.
New Software Tile
To publish new software, select the “+ add software” button above the list table. You also need to create the software tile or analysis first before you can create any versions. The CLI is an exception (see CLI section below). You can pick any version method you want, as long as the version name does not already exist for that software. (examples – “1.0”, “2a”, “version1”, “20”, etc.)
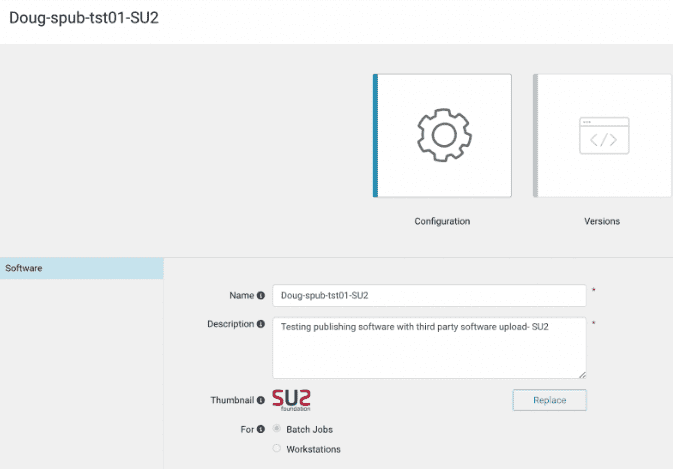
Under the configuration section, fill out the fields for the name and description of the new software to add to the catalog. Select batch or workstationA workstation is a powerful computer system designed for pro... More for the software you will publish, if your intended use of the published software is via jobs or via interactive Workstations. The thumbnail image is optional to provide- the size must be under 100K.
Here is an example from the UI after creating the initial software tile, before publishing any versions:
New Software Version
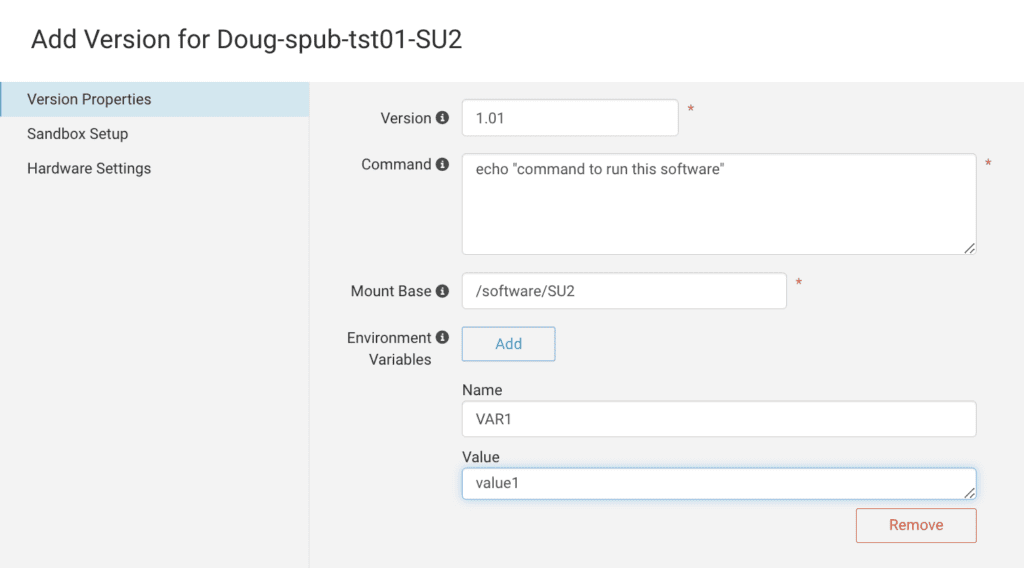
Once you add your software tile, then you can publish one or more versions. Select the software tile you created from the list, and then click on the “Versions” icon. Select “+ Add Software Version”. A new window will appear with three selection options on the left for “Version Properties” , “Sandbox Setup”, and “Hardware Settings”. Beginning with the Version Properties page, fill in the required fields. Optionally you can provide environment variables that your published software can reference when running as part of a job:
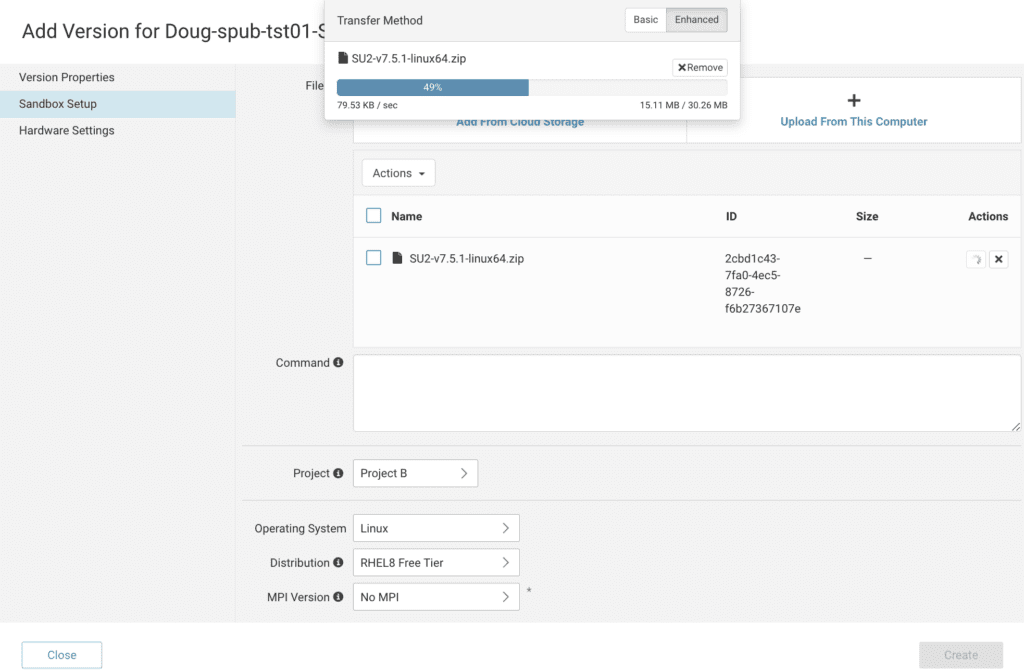
Now navigate to the “Sandbox Setup” page. You can upload your software from this page, specify the operating system, and indicate if your software has any MPI dependencies or not. The project field is optional, and only required if the current workspace you are publishing from is configured to require selecting a project. For the sandbox size, try to pick a size that is large enough to install and test your software, but not too large as to waste unused space.
There is an optional command field on this page that is different from the command on the version properties page. This is meant to run a script to automate installing the software after it is uploaded. If you leave this command field empty, you can access the sandbox interactively to perform any necessary commands and configurations before publishing.
Currently, only Linux OS distributions are supported for creating the sandbox environment.
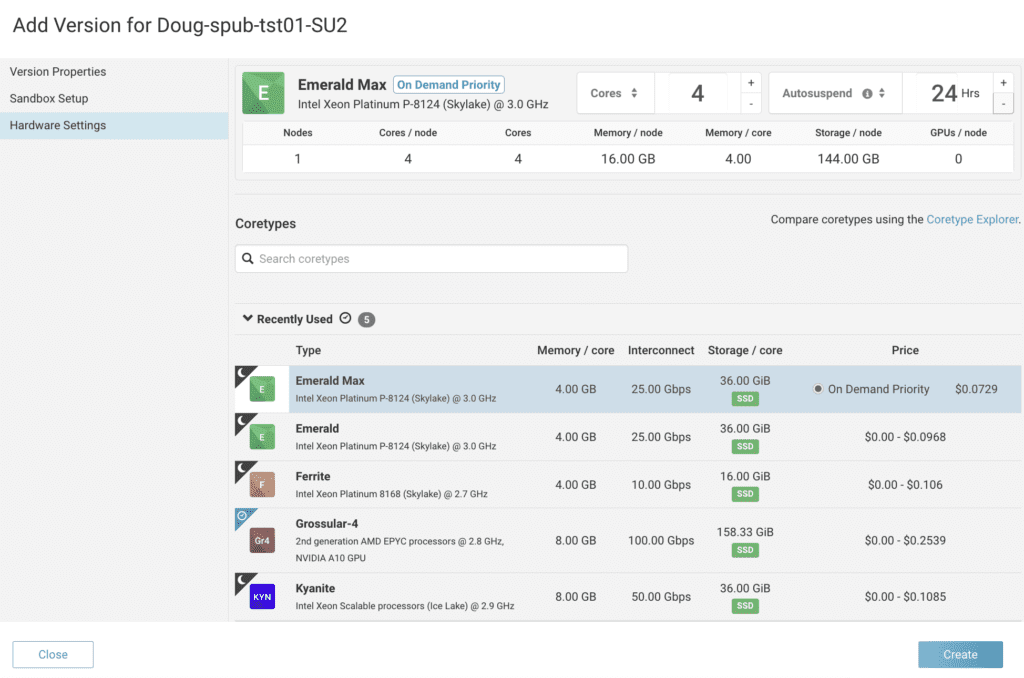
Then navigate to the “Hardware Settings” page. Here you can select from a variety of processor corean individual processing unit within a multicore processor o... More types that are available, and also set the number of cores you want your sandbox to run.
Create
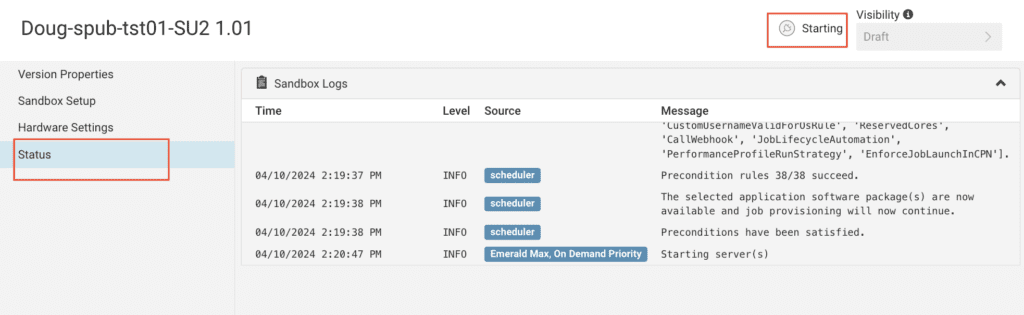
When you complete filling out the sandbox information on all pages, click the “create” button. You have the option to review any page before creating the new sandbox. You will see a new “status” window appear. If you select it on the left side, you can monitor the sandbox creation progress:
Active
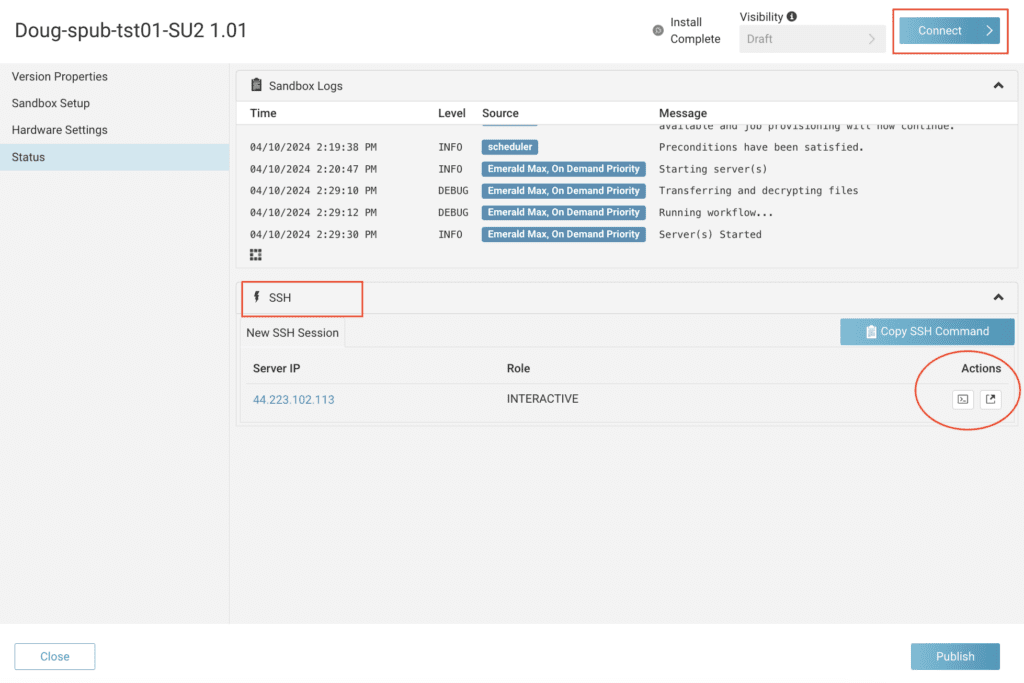
When sandbox setup is complete, you will see a new SSH section appear, and also a new “connect” button at the top. There are different ways you can connect directly to your sandbox after it is created:
- DCV desktop emulation by selecting the “Connect” button
- In-browser SSH connection by clicking under the “Actions” section
- SSH connection from your local workstation. This is a more advanced option that is covered in the product documentation under “SSH From Local Workstation“.
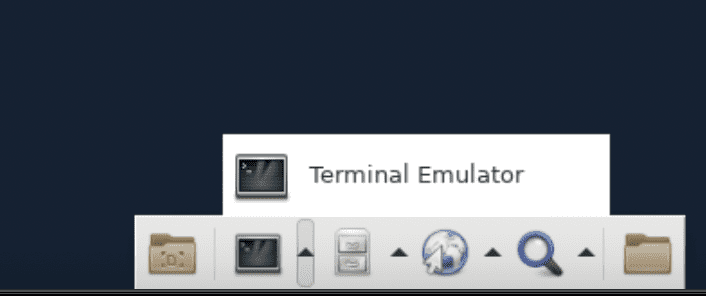
In this example we will choose the “Connect” button to proceed. The virtual desktop environment is using Rescale Workstations underneath. To access a terminal window for shell / CLI options, select the terminal emulator button on the bottom:
If you chose to upload software when creating a new sandbox, the software should be placed in the mount base or mount point path location specified. There is an option in the UI when uploading files to select automatically uncompressing and extracting TAR files.
In this interactive mode, you can log in to your sandbox and perform commands via a SSH or terminal session.
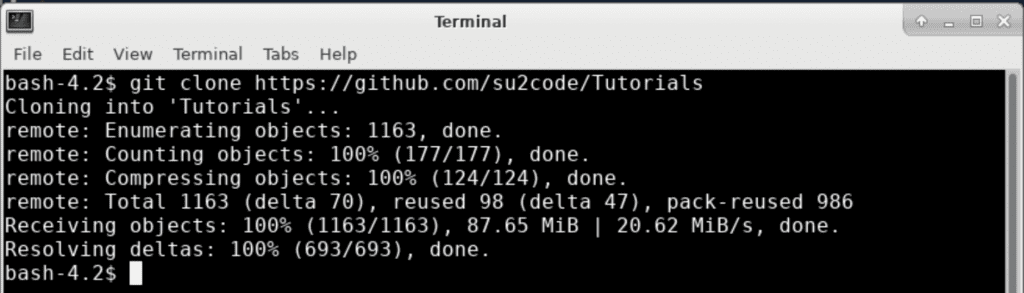
You can run git() directly from your sandbox to retrieve software or other material, such as test data. Here is an example retrieving Tutorial data for a HPC software package (SU2):
You also have other options to move or transfer software to your Rescale sandbox environment, such as sftp().
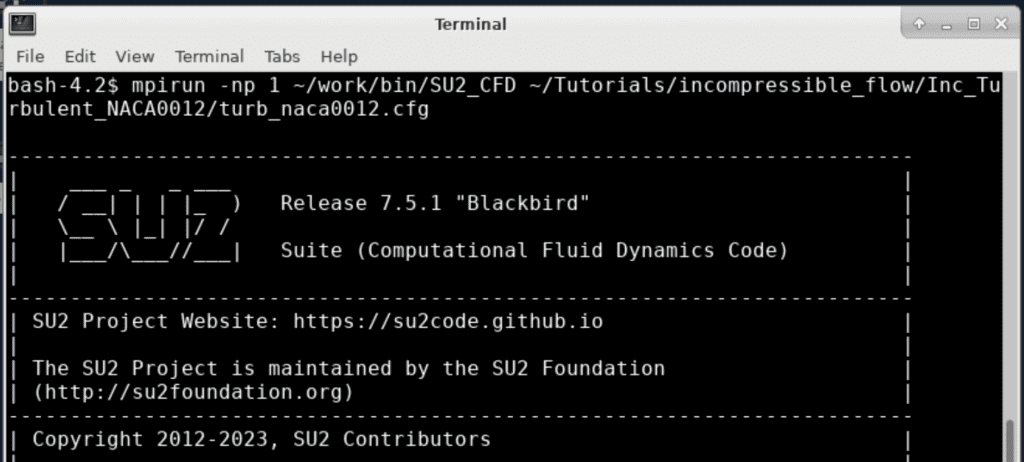
It is highly recommended that software be tested prior to publishing! Here is an example via interactive modelA numerical, symbolic, or logical representation of a system... More starting a sample test:
Publish
When you are ready to publish, you should copy or move all of the necessary software files under the mount point base before publishing, and clean up / remove any temporary files not needed to run the software.
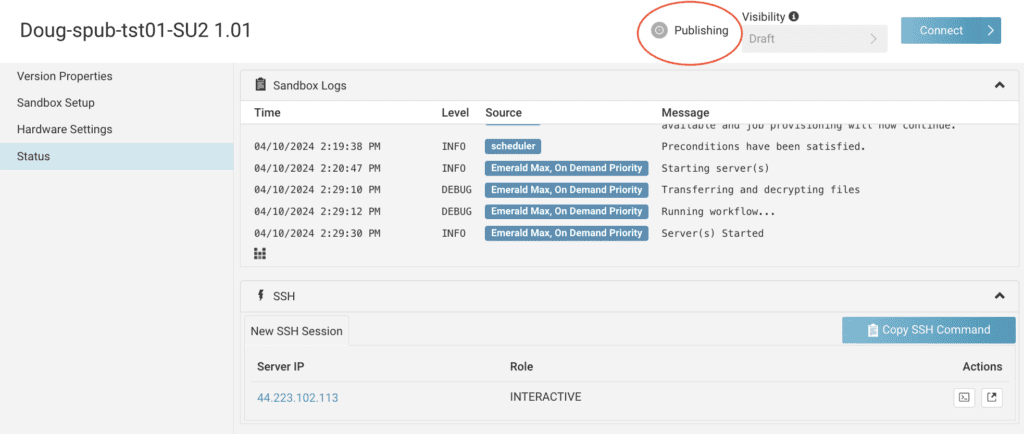
From the UI, select the “Publish” button at the bottom of the status page. You will see the status value at the top of the page change to “Publishing” , and then later transition to “Completing” :
| NOTE: this step can take a few minutes, as it is doing several steps behind the scenes to make this software version available for use. |
When your software version publish action is completed, you will see the version status updated to “Completed”:
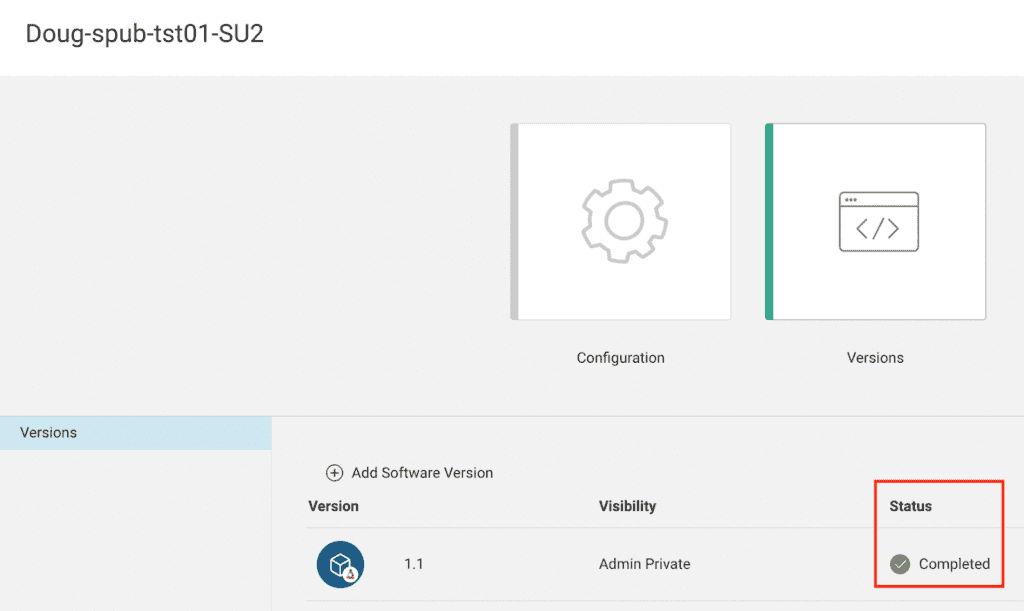
Visibility
There is also a “Visibility” column when viewing a published version. There are multiple visibility settings that administrators can set to promote the software between stages after it is initially published. They are as follows:
| Visibility Settings / Stages | Description |
| Draft | Initial state of starting a new version publishing session. Sandboxes exist in this publishing state. No physical snapshot exists yet, and software is not visible in the Rescale Catalog for the organization. |
| Admin Private | A physical snapshot is first created in this stage of publishing. The sandbox is removed. Software can only be viewed and accessed by Administrators from the catalog. |
| Workspace Private | This is one option to share your published software version with others. Promoting the visibility of published software to Workspace Private makes it available to the named workspaces you select. You must have either org admin privileges, or be a workspace admin for the workspaces you wish to share. |
| Organization Private | This is another option to share your published software version with others. Promoting the visibility of published software to Organization Private make the software visible to all members in your organization, across all workspaces. |
From the UI, here is how you set the visibility of a published software from its initial state, which by default always starts with “Admin Private”. On the version -> status page:
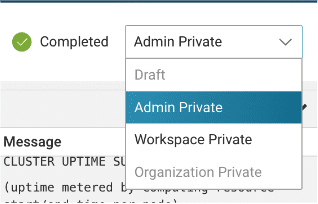
Admin Private
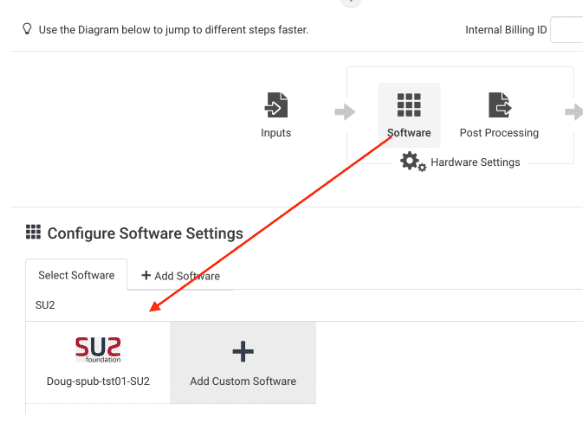
When your software is published to the initial state, Admin Private, you as an administrator, and other administrators with the proper access in the workspace published, can access and use this new software tile or version from the Rescale software catalog when creating jobs. The visibility at this stage is limited to just the admins:
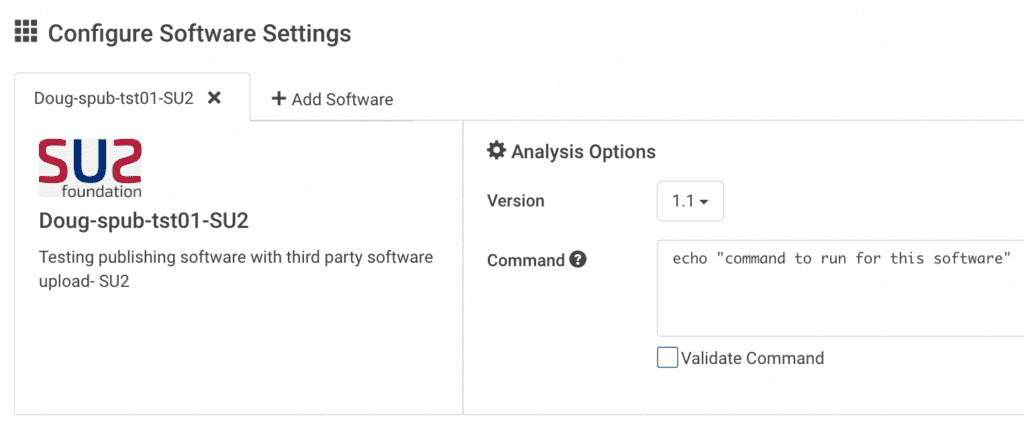
Details of new published tile:
After you test and validate this software version is working ok, you can now share it with others in your organization.
| REMINDER: Always test and validate before making published software available to others! |
There are two visibility options when you want to share your newly published version with others:
- Publish visibility of the version to specific workspaces (workspace private)
- Publish visibility across all workspaces in the organization (organization private)
Workspace Private
From the Versions page, select the version number you just published. At the top of the page next to the “Completed” status, select the menu and pick “workspace private” to promote the visibility of your published software version to a named list of workspaces. On the left side, select “Allowed Workspaces” and pick the workspaces you wish to share this software version with:
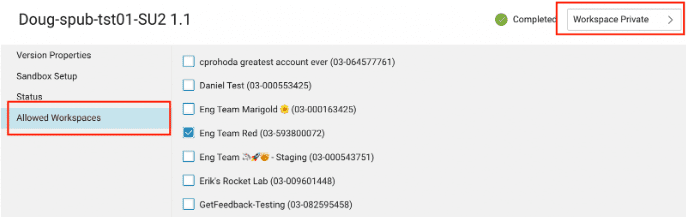
You can only select workspaces that you as an Administrator have access to.
Organization Private
You would follow similar steps as previously described in changing the visibility of a published software version to “organization private”. Note that you need to be in the role of an organizational administrator for this option to be selectable in the UI. If your user is just granted admin access to a workspace, you cannot set visibility of published software to organization private.
Command Line Interface
Publisher is accessible from the Rescale CLI via a new argument / option , ‘spub’. You first need to download the latest CLI package as a user and install it on your local machine.
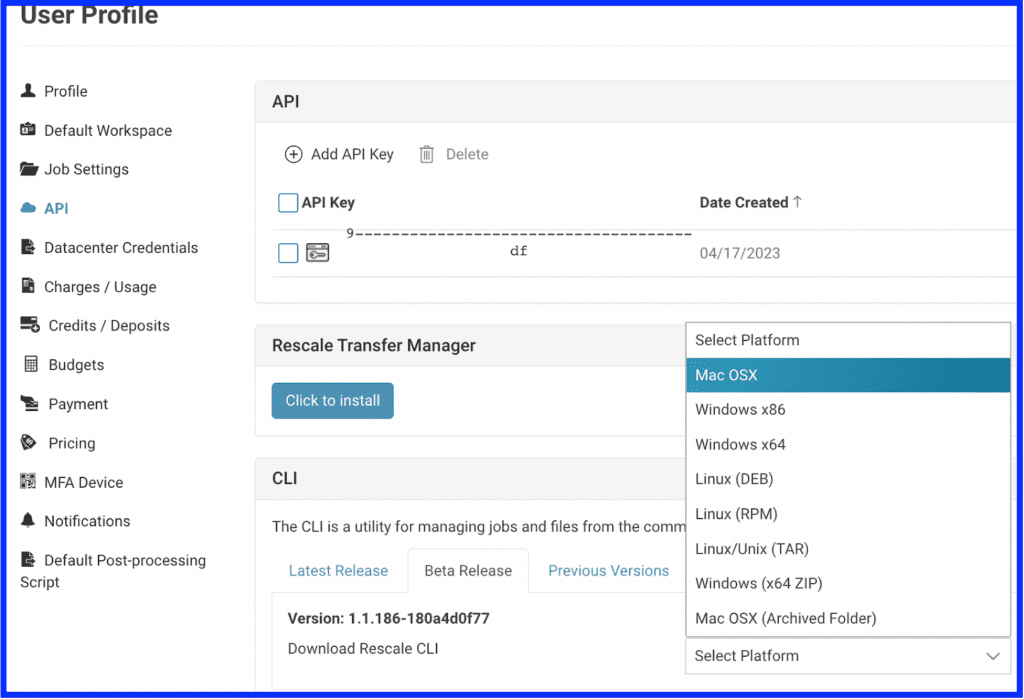
Within the product UI, from your account login menu on the top right, select “User Profile Settings”. Then on the left side rail, select “API”. If you do not have an API key already generated, do that now by selecting “+ Add API Key”. You will need to provide this key value when using the CLI for publishing.
In the CLI section on that same page, click on the “Beta Release” tab, and select the platform you plan to run the CLI from:
CLI Install- Mac
When you download the CLI file from the UI, it is packaged as a *.dmg file for Mac OSX. OPen that file to begin the installation process. Follow the instructions provided:

The Rescale CLI is by default installed under /applications/Rescale CLI as the binary “rescale-cli”. You can either add this directory to your PATH, or run the rescale-cli within the installed directory location.
| TIP: copy and paste your Rescale API key value, and software tile name, to a handy location for use with the CLI. |
CLI Install – Windows
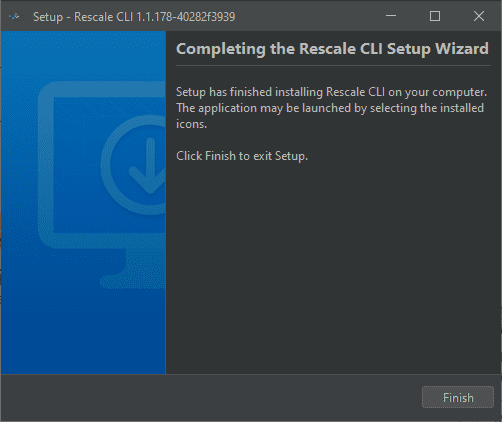
When you download the CLI file from the UI, it is packaged as an *.exe file for Windows x64 or x86x86 is a widely used computer architecture and instruction s... More. Open that file to begin the installation process. Follow the instructions provided:
The Rescale CLI is by default installed under C:\Users\[username]\AppData\Local\rescale-cli as the binary “rescale-cli.exe”. Run the command from Command Prompt or Windows Powershell
CLI Usage
There is no syntax usage difference in the Rescale CLI between the different client platforms.
Some getting started tips when using the Rescale CLI:
- Each publisher command will start with this syntax: “rescale-cli -X https://yourplatform.rescale.com spub …”. Adjust the URL accordingly to the Rescale platform your organization is hosted from.
- Each command line execution needs to include your Rescale API key, typically the end part of your command in the format: “-p <reallyLongHexaDecimalValue>”.
- To operate on a software tile or version, use the “tile” argument to spub. There is no “version” option for spub to use.
- The spub sub-command and the options to it both support help options via “-h” or “–help”
Here is a summary table showing the sub-command and options broken out in categories – object or “noun” and action or “verb” The logs option doesn’t quite fit in as a verb :
| Root Command: | Top level sub-command: | Object level argument / option / parameter(noun) | Action level argument / option / parameter(verb) |
| rescale-cli | spub | tile | create |
| sandbox | publish | ||
| help | list | ||
| connect | |||
| logs | |||
| upload-file | |||
| suspend | resume | |||
| terminate | |||
| delete (coming later!) |
The command line interface for spub has help information that is context sensitive. For example you can view help content at a general level for ‘tile’, and view more detailed help content for a specific argument that tile supports, such as “tile create”.
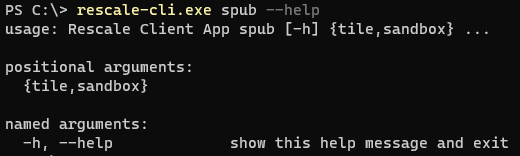
Here is sample output of the help for the two main object options supported- tile and sandbox :
% ./rescale-cli -X https://platform-stage.rescale.com spub -h
usage: Rescale Client App spub [-h] {tile,sandbox} ...
positional arguments:
  {tile,sandbox}
named arguments:
  -h, --help             show this help message and exit
% ./rescale-cli -X https://platform-stage.rescale.com spub tile -h
usage: Rescale Client App spub tile [-h] {create,publish} ...
positional arguments:
  {create,publish}
named arguments:
  -h, --help             show this help message and exit
% ./rescale-cli -X https://platform-stage.rescale.com spub sandbox -h
usage: Rescale Client App spub sandbox [-h] {connect,list,logs,resume,suspend,terminate,upload-file} ...
positional arguments:
  {connect,list,logs,resume,suspend,terminate,upload-file}
named arguments:
  -h, --help             show this help message and exit
%
There is also help context for the command line options that are actions or verbs. Here is one example showing help for “create” being used with the tile option:
% ./rescale-cli -X https://platform-stage.rescale.com spub tile create -h
usage: Rescale Client App spub tile create [-h]
                          [--visibility {admin-private,workspace-private,organization-private}]
                          [-s SETTINGS-FILE] [--silent-mode] [-f INPUT-FILE-PATHS [INPUT-FILE-PATHS ...]]
                          [-fid INPUT-FILE-IDS [INPUT-FILE-IDS ...]] [-p API-TOKEN]
named arguments:
  -h, --help             show this help message and exit
  --visibility {admin-private,workspace-private,organization-private}
                         admin-private|workspace-private|organization-private
  -s SETTINGS-FILE
  --silent-mode
  -f INPUT-FILE-PATHS [INPUT-FILE-PATHS ...]
  -fid INPUT-FILE-IDS [INPUT-FILE-IDS ...]
creds:
  -p API-TOKEN, --api-token API-TOKEN
                         The Rescale API token to use for authentication
%
When you create a new software version via the spub CLI, for either an existing software tile or a brand new one, you will be asked to provide answers to a series of prompts:
- Software code
- Software name
- Software description
- Software version name
- Software version code
- Software mount base
- Software command
- Number of environment variables to add
- Sandbox core count
- Sandbox OS family
- Sandbox distro
- MPI type
- Installation command
- Installation volume size in GB
- Installation mount point
These are more options than you see via the UI. Some notes about these CLI prompts for creation:
- Software code, and software version code, are internally used values in the product. Publisher will take those values and make them unique. We may remove these from the CLI in the future. For now, you can provide the same values the following pairs of fields:
- Software code = Software name
- Software version code = Software version name
- Installation mount point can be the same value used as software mount base. Only provide a different value for installation mount point if you want the software in your sandbox to be installed in a different directory than the mount base. It is the software mount base that is used for the final publish of the software version, so be sure your software is placed under this mount base in your sandbox prior to publishing.
Here is example output of a spub create command:
you@rescale.com@You Rescale CLI % rescale-cli -X https://platform-stage.rescale.com spub tile create -p 0000f4861c760156b87b94c664f026141dcb3ddf
2023-04-17 16:45:12,391 - Authenticated as dfierro@rescale.com
Please enter the software code:
You-spub-tst01-SU2
Please enter the software name:
You-spub-tst01-SU2
Please enter the software description:
My software description for this version
Please enter the software version name:
1.0
Please enter the software version code:
1.0
Please enter the software mount base:
/software/spubtst/SU2
Please enter the software command:
echo test software command
Please enter the number of environment variables you’d like to add:
0
Please enter the sandbox core count:
4
Please enter the sandbox walltime:
24
Please enter the sandbox os family:
linux
Please enter the sandbox os distro:
linux8
Please enter the sandbox mpi type or leave blank for none:
none
Please enter the installation command:
echo test installation command
Please enter the installation volume size in GB:
5
Please enter the installation mount point:
/software/spubtst/SU2
2023-04-17 16:50:03,017 - Sandbox: Syncing software
2023-04-17 16:50:03,668 - created dev analysis wQVseb
2023-04-17 16:50:04,107 - created dev analysis version iXVkhb
2023-04-17 16:50:04,108 - created dev analysis version iXVkhb env
2023-04-17 16:50:04,130 - Uploading Files
2023-04-17 16:50:04,136 - Uploading: /var/folders/vx/6777877n4p517_ymy_224gwc0000gn/T/rescale-cli-work8858473315941349202/settings.json
2023-04-17 16:50:04,137 - Uploading settings.json:
2023-04-17 16:50:05,290 - ##############################| 848B / 848B
2023-04-17 16:50:08,285 - Sandbox: Saving Sandbox
2023-04-17 16:50:11,586 - Sandbox Ysnugb: Saved
2023-04-17 16:50:15,455 - Sandbox Ysnugb: Waiting for status INSTALLATION_COMPLETE
2023-04-17 16:51:15,840 - Sandbox Ysnugb: Status - SANDBOX_STARTING
2023-04-17 16:52:16,237 - Sandbox Ysnugb: Status - SANDBOX_STARTING
2023-04-17 16:57:18,232 - Sandbox Ysnugb: Status - INSTALLATION_COMPLETE
2023-04-17 16:57:18,232 - Sandbox creation completed.
Please perform any manual installation steps on the sandbox before running `spub tile publish --sandboxId Ysnugb` to publish the software.
Sandbox connection info can be retrieved with `spub sandbox connect --sandbox-id Ysnugb`.
you@rescale.com@You Rescale CLI %
Software Portability and Helper Functions
When bringing your own software to the Rescale platform, a best practice is to make your software application, package, or tool as portable as possible. This is because the Rescale platform is architected so that the software which runs on our managed compute clusters is de-coupled from the underlying hardware and operating system. This allows customers maximum flexibility when choosing core hardware options and target environments to run their high performance compute workloads. If your HPC software becomes too intertwined with the underlying operating system, or has other hard-coded dependencies, over time your software solution will become more brittle, and simple updates like an OS patch may require you to re-install and test your software each time such changes occur.
This is why Rescale sandboxes by design do not allow super user or administrator privileges such as the root user account or sudo access, as well as for security reasons. However it is still possible you can install, run, and test your software within the Rescale controlled hosted environment successfully without requiring such elevated access. With every sandbox that is created, Rescale provides a set of utilities that help you with installing and testing your software so it is portable and flexible. These helper functions address many common install commands and packages that typically require root or sudo access, from yum install to python pip . Below is an overview of the Rescale helper functions and utilities that you can use to ensure your published software is portable and follows recommended best practices.
Using Spub Helper Utilities
At a high level, the Operating System (OS) image in the sandbox is representative of clusters that will run the software that is installed. However it is important to note that the Rescale design for publishing and running software on the platform decouples the software you publish from the underlying OS. The published software and OS are not stored together as one volume or snapshot. This design is to maximize the portability of published software in the Rescale Catalog, so software that is published can run on a variety of hardware platforms and environments.
Many users that are accustomed to installing, configuring, and running HPC software packages, applications, and other supporting tools in a dedicated local environment where they have root or admin privileges within the operating system to directly add and modify files in any location, will need to adjust their approach when making software available on the Rescale platform for use. The main paradigm shift when publishing software in the Rescale platform, is you need to package your software so that any dependencies are self-contained within a designated directory area, which is referred to as the mount point or mount base of your software. Because software that is published in the Rescale Catalog needs to be portable – it can be selected to be run with jobs across different hardware core types and even different CSPs- as a best practice you should not install or modify any files directly in the OS area. There are some common software dependencies that Rescale provides automatically such as compilers and MPI libraries which are made available in consistent locations under the mount base directory, to ensure your published software remains portable. In addition, these following Spub helper tools are also provided to users who are publishing software on the Rescale platform, which are documented in more detail later.
When working in a virtual sandbox to upload, install, configure, and validate software, the entire VM will not be saved upon publishing. Instead, a snapshot of the mount base volume and relevant environment settings are captured. This has implications regarding the portability of the installation and must be handled with care. In general the advice is to ensure that all requisite binaries, scripts, libraries, etc. are all located under the mount base you specify for your software.
As an example, if the path “/software/my-great-software” as the mountbase, this may look something like this:
/software/my-great-software/software/my-great-software/bin/software/my-great-software/scripts/software/my-great-software/lib
To aid ensuring a portable installation and ease some of the burden on the user, Rescale provides a number of helper functions that are pre-configured and set up by default to point installations to the mount base selected in the UI. These functions are prefixed with spub_* and can be listed and described from a terminal on the clusterA computing cluster consists of a set of loosely or tightly ... More with the command spub_helper_list. The spub_help function will always have the most up to date instruction set as new helpers are added.
The location of these spub helper functions are installed in a default location for every Publisher sandbox created. This directory is /program/sxp-interactive/util , referred to as SPUBUTILS for reference in this document. Here is a directory listing of the contents:

An overview of the available spub helper functions is provided if you view the following file:
> $SPUBUTILS/spub_helper_list | more
When running a helper function interactively there will often be actions that need to be performed by the installer, such as adding PATHs to the current shell or setting an environment variable. These will be brought to the attention of the user via messages in the shell. e.g.
*****************************************************************
*********************** IMPORTANT **************************
*****************************************************************
Please run the following command in your shell before proceeding:
source /program/my-great-software/venv/bin/activate
There are several use cases to highlight where it is necessary to use the built in helpers.
yum: spub_yum_install
Typically when using third party package management systems, e.g. yum, dnf, it is designed to install at the system level. This requires both admin rights on the cluster and places the installed libraries at locations that will not carry over to the published analysis. A wrapper that mimics yum install is provided that downloads rpms and installs them under the mountbase. Rather than running sudo yum install cowsay with the helper the command becomes spub_yum_install cowsay
You may get a message after running spub_yum_install to export environment variables in your shell. Follow the instructions as provided:

python: spub_add_python_venv
It is good practice in general to create a virtual environment when running python code that requires a number of external packages (e.g. numpy, pandas, …). To accomplish this in a Rescale publishing sandbox, the utility spub_add_python_venv should be used. This will set up a python virtual environment with a choice of version and make sure that any packages installed via pip will be available when the sandbox is published.
NOTE: always run the source command provided at the end after spub_add_python_venv completes:
>source /{YOUR_MOUNT_BASE}/venv/bin/activateNote if for any reason you encounter issues with running this helper function, you can back it out by running spub_remove_venv and start over. You only need to run this command once within a sandbox.
There is a known Python limitation that spub_add_python_venv does not support installing non-standard packages that are manually added to the repo. The workaround for such Python packages is to build them from the source code in the sandbox.
gcc: spub_update_gcc
The default version of gcc currently provided for Publisher sandbox machine images is quite old. Use the spub utility spub_update_gcc to upgrade to a newer version. Currently only versions 7 or 8 are supported with this spub helper function. If you need a newer version, you have to manually install it within your sandbox environment.
all: spub_validate
It is recommended to run some small testcase while the sandbox is still running to ensure that the software is configured correctly. If the binaries run and all libraries are found then it should be ready for publishing. When you are ready for final validationValidation is the act of ensuring that a product, system, or... More, spub_validate is provided to help check if there are any environment variables or PATHs that reference the home directory which will not carry over to future Rescale clusters. These may end up being innocuous, but on the other hand may need to be remedied by an action such as moving the location of a script/library etc. to the mount base. e.g.
[uprod_eqrCUc@ip-10-25-10-6 ~]$ spub_validate Extracting and saving current environment settings
::: WARN: You have an ENV VAR defined that references the ephemeral $HOME in this sandbox:
Name: BAD_VAR
Value: /enc/uprod_eqrCUc/foo
After checking the environment, this sandbox can be published and this environment will be recreated on future Rescale jobs. The output of running spub_validate is written to the following directory under your designated software install point: $MOUNT_BASE/rescale . There are three files created:
command_history.txt– captures all the commands run within your shelldraft_env.sh– intermediate file if session exits prematurely, resumed at next loginrescale_env.sh– only incrementally added or modified ENVs appear in this file. Default ENVs that Rescale generates are not included in this file.
Here is an example output of a successful spub_validate run :

In this example, the instructions are to add a new environment variable name and value to your software version you are testing and validating, directly from the Publisher UI:

There are an assortment of other helper functions that are essentially package installers designed to build things in a way that runs optimally on Rescale clusters. These follow a naming convention of spub_add_<pkg>, e,g. spub_add_R. There will be a default version stated that can be overridden by user input. In addition to building the packages they will provide instructions on how to ensure that actions such as installing additional R libraries will be saved correctly and available in the published analysis.
Common Questions
- What if I need a specific version of Python installed that is not the default version in the sandbox?
Using the spub_add_python_venv helper function, you can specify the version of Python you want installed in your sandbox environment. It will be the first prompt you see:

Upon success you will see a message saying the Python version was installed under your mount base directory:
Installed Python-3.8.16 to /{YOUR_MOUNT_BASE}/pyenv/versions/3.8.16IMPORTANT: follow the instructions provided at the end of running this helper function, to source this file:
>source /{YOUR_MOUNT_BASE}/venv/bin/activate- How would I perform a Python pip install without requiring direct root or sudo user access within the sandbox?
First follow the above example on how to create your Python virtual environment within the Publisher sandbox using spub_add_python_venv . Then be sure to run the source command afterwards: source /{YOUR_MOUNT_BASE}/venv/bin/activate . After you complete these steps, you can verify that the python binaries and tools you are referencing from your PATH now are in this location: /{YOUR_MOUNT_BASE}/venv/bin .
bash-4.2$ source /program/SWBASEDIR/venv/bin/activate(venv) bash-4.2$ which pip/program/acecast2/venv/bin/pip(venv) bash-4.2$ which python/program/SWBASEDIR/venv/bin/python(venv) bash-4.2$ Don’t forget to also run spub_validate .
Now you should be able to run a pip install command like:
pip install <pkg-name>
- How do I get a newer version of gcc?
Refer to the helper utility above, spub_update_gcc
- While using the spub* helper functions, I got an error message “no space left on device”. How do I recover?
Running a python pip install can result in reaching the sandbox disk limit size if you created the sandbox with a size of 1GB. There is no way currently to dynamically increase the disk size of a sandbox. The workaround is you will need to cancel this publishing session, and create a new software version with a larger sandbox disk size.
You can run the “df -H” command to view available space under your MOUNT BASE directory.
Advanced Use Cases
MPI –
If MPI is needed for the desired analysis, there are further considerations that need to be made. There are several pre-configured MPI flavors that can be selected through the UI for the build sandbox. Rescale will generally configure the latest or very recent versions. Ideally these will be suitable for most applications, and keep in mind many modern MPIs are backwards compatible. Additionally there is ABI compatibility across different flavors, Rescale offers Intel MPI which can be used with code compiled with an ABI compatible MPI (e.g. MPICH). It is possible to install an MPI from source or through a package management system such as Spack, however, this is not recommended.
When an MPI version of the sandbox is selected there will be some Rescale provided MPI wrapper scripts that are added to help aid in keeping the installation as portable as possible. The command mpirun is aliased and will by default add the necessary libraries and flags depending on the type of hardware the software is run on in the future. It is recommended to keep this abstraction in place, which should happen unless PATHs are explicitly set pointing to a different mpirun than the default. This also helps maintain a canonical behavior across software published by Rescale HPC and self published analysis.
If compiling a code from source there will likely be a need to point to a config to the appropriate MPI location. Regardless of the MPI version, the location will be stored in the environment variable MPI_ROOT. A configure step in the traditional make paradigm might look like:
$./configure --with-mpi=$MPI_ROOT --prefix=/program/my-great-install …
Intel Compilers –
Rescale provides the Intel oneAPI toolkit as part of the sandbox OS under /opt/rescale/oneapi. You can select this as an option when publishing a new version of software with Publisher – on the sandbox version page, select “Intel MPI 2019” as the MPI version. To have the Intel compiler components available within your PATH, you need to source the following file within your sandbox:
source /opt/rescale/oneapi/setvars.sh
Alternatively, you can use absolute path names to the compiler artifacts.