
NGC CUDA Quantum on Rescale

Overview
In this tutorial, we will learn how to get started with NGC CUDA Quantum on the Rescale platform using the NGC Container image which contains all CUDA Quantum releases.
We will use the built-in examples within the Nvidia CUDA Quantum image to demonstrate the agility, scalability and ease of use of the Rescale platform to perform Quantum algorithm research and look at simulationSimulation is experimentation, testing scenarios, and making... More examples.
Note: You will require an Nvidia account so that you are able to access your API Key and Org ID which are prerequisites for pulling the images from NGC ContainerA package of self-sustaining application and operating syste... More Registry and working within those. If you intend to use QPUs, you will need accounts/API keys with the relevant backend QPU Hardware providers as well. An architectural prerequisite for CUDA Quantum is availability of the listed GPU Architectures: Volta, Turing, Ampere, Ada, Hopper. For availability and capacity of these GPU architectures on Rescale, please contact your Rescale Solutions Architect.
Nvidia CUDA Quantum can be run by either using a ‘batch’ job (more conveniently called a ‘headless’ job) to work with CUDA Quantum using SSH or interactively using Rescale Workstations (GUI on head-node). Both options provide access to a variety of hardware present on the Rescale platform, including Nvidia’s highly performant GPUsGPUs (Graphics Processing Units) are specialized electronic ... More.
We shall look at exploring Quantum algorithm research using the NGC CUDA Quantum image on the Rescale platform by firstly simulating qubits using the underlying Nvidia GPUs and then sending a sample job to a Quantum Simulator backend to one of the Nvidia Partner Quantum hardware providers (IonQ).
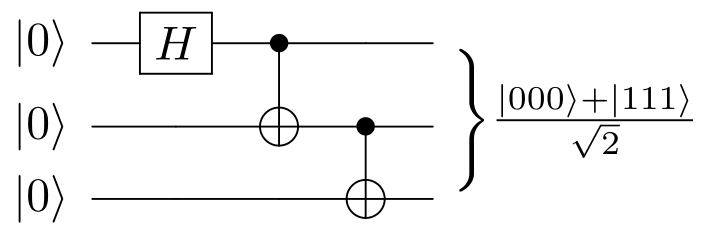
We start by launching a built-in example that simulates GHZ states using 30 Qubits which is too large for a standard CPU-only simulator, but can be trivially simulated via an NVIDIA GPU-accelerated backend. GHZ states are used in several protocols in quantum communication and cryptography, for example, in secret sharing or in the quantum Byzantine agreement and are an important piece in developing effective quantum algorithms of this nature.
Source
Nvidia CUDA Quantum provides native support for cuQuantum-accelerated state vector and tensor network simulations.
See the tutorial steps below.
Rescale Batch – NGC Interactive job
You can access and directly launch the sample job by clicking the Import Job Setup button or view the results by clicking the Get Job Results button below.
Steps to run a batch job on Rescale
Select input file
Upload your job files (if needed, recommended to use compressed files). These will be loaded automatically when you select Import Job Set Up above.
Note: Rescale platform understands compressed files and they are automatically uncompressed to the ./work/shared/ folder
In this case, it is not required to upload any input files as the NGC container image incorporates all the underlying examples in this tutorial.
Select software
On the software tile, select NGC and specify the command line and API details as below.

For this tutorial, we will use the latest version of Nvidia NGC CUDA Quantum at the time of writing (0.4.1)
For a typical Rescale batch job, you can directly modify the pre-populated CMD line with all the commands to run in a linux terminal. See the example below for how we will launch this NGC Container and pull the relevant CUDA Quantum image
# Access NGC Containers:
https://docs.nvidia.com/ngc/ngc-overview/index.html#accessing-ngc-software
#Enter your API key and org code in the licensing section and use the template below to automatically authenticate catalog access
#If you would like to modify the login commands below, this is the template: "echo -e "API_KEY \n FILE_FORMAT \n ORG \n TEAM \n ACE \n" | ngc config set"
echo -e "\n \n $(echo $NGC_ORG_ID) \n \n \n" | ngc config set
docker login -u '$oauthtoken' --password-stdin nvcr.io <<< $(echo $NGC_CLI_API_KEY)
docker pull nvcr.io/nvidia/cuda-quantum:0.4.1
sleep inf
Note: The ‘sleep inf’ command at the end ensures that after successfully pulling the docker image, the Linux clusterA computing cluster consists of a set of loosely or tightly ... More is kept open to work with it via SSH. Else, it assumes exit code 0 and that the job has completed.
Once you have specified the software and the command line to execute the example, next specify your NVIDIA API Key and Org Code under Licence Options.

It is not necessary to specify license feature usage.
Select Hardware
On the next page, you will find the options to choose hardware for your analysis. Here, you can search for ‘A100 or V100’ GPUs to show GPU machines available on the Rescale platform. Below is an example search showing A100s which are quite in demand for this type of research
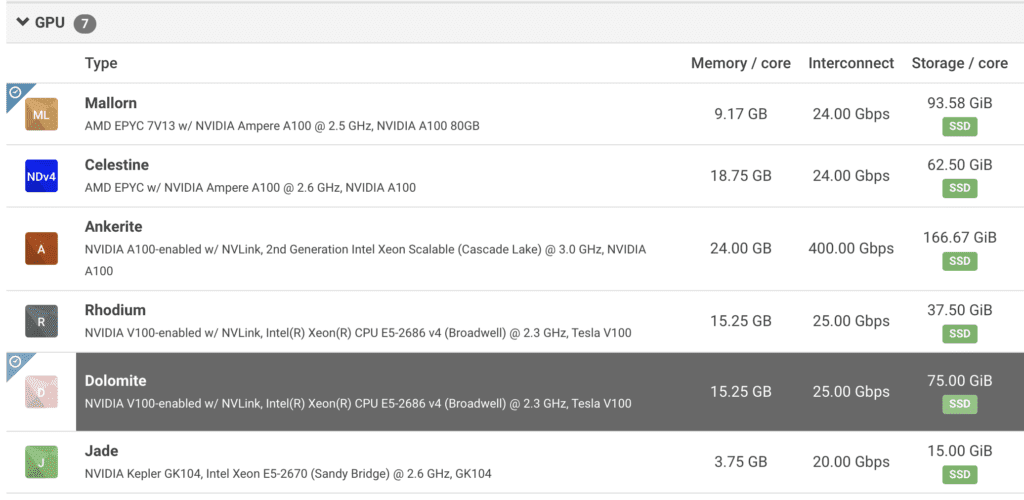
Once you pick up a CoretypePre-configured and optimized architectures for different HPC... More, you can see the number of GPUs that will be available on the machine / nodeIn traditional computing, a node is an object on a network. ... More.

For more complex examples, you may choose multiple nodes to increase the number of GPUs available for simulated qubits. For the built-in examples, select one of the Nvidia GPUs with minimal cores/nodes which shall suffice to demonstrate and learn the capability.
Once you have chosen your preferred hardware, you are ready to click ‘Submit’ and launch the Cluster and will pull the NGC CUDA Quantum container.
Job Monitoring
Once the job launches, you can use the built-in web based SSH or connect via your local SSH client. Note that there is a process_output.log additionally created that can tell you Rescale specific info on where the cluster launch and command outputs are at.

Once the job has launched, access the cluster via SSH:

Simulating Qubits using CPUs and GPUs
Invoke the CUDA Quantum image by using the command as below:
docker run -it --gpus all --name cuda-quantum nvcr.io/nvidia/cuda-quantum:0.4.1
Note: If you do not mention –gpus all flag, you will only be able to use the default CPUs. It is recommended to run this flag on your container launch to enable support for GPU-accelerated backends, in addition to any CPUs you may wish to access. For QPUs, no flags are needed when launching the container.
We shall use the C++ examples present in the examples/cpp library.
Here we generate a GHZ state on 30 qubits as per the built-in example ‘cuquantum_backends.cpp’.To run with the built-in cuQuantum state vector support, we pass the –target nvidia flag at compile time:
nvq++ --target nvidia examples/cpp/basics/cuquantum_backends.cpp -o ghz.x
Now run the compiled cuquantum_backends example on Nvidia GPUs using the command below:
./ghz.x
This shall provide a result similar to the below screen:

Now, for curiosity, feel free to try what happens if you compile this code WITHOUT–target nvidia flag and then run it as above. Recommend you open a New SSH session to observe the CPUs getting overloaded. The 30 qubits shall either crash a CPU based only compilation or take a very long time. This demonstrates the value of running this example on GPUs for algorithm research to simulate the behavior of a Quantum Circuits and QPUs prior to accessing the actual QPUs so you can be sure your cost/resource are being utilized after best testing on the HPCThe use of parallel processing for running advanced applicat... More infrastructure available.
Sending Jobs to Quantum Hardware Providers
Now that we have seen how to ‘simulate’ a Quantum algorithm using traditional HPC infrastructure, let’s see how to use the same interface to send jobs to a specialized Quantum Provider (Quantum Hardware Partners supported by Nvidia)
The C++ example jobs for various Quantum providers are placed in the following directory by default (at the time of writing): examples/cpp/providers
We shall look at IONQ Quantum backend in this example and the same method can be followed for other supported Quantum Hardware providers on Nvidia CUDA Quantum. The example compiles and runs a simple quantum kernel to execute on IonQ.
First of all, you will require an account with IonQ and an API key.Generate an API key from your IonQ account and export it as an environment variable:
export IONQ_API_KEY="ionq_generated_api_key"
Then, run the following command by specifying the target this time as ionq:
nvq++ --target ionq examples/cpp/providers/ionq.cpp -o out.x
This command will compile the C++ example with a target for IonQ as the hardware provider. By default, if you do not specify the target Quantum Computer, it will go to IonQ’s machine named ‘Simulator’ which is the default configuration.You can specify your target Quantum Computers available on IonQ by using the commands as “nvq++ –target ionq –ionq-machine qpu.aria-1 example.cpp”. Full list of Quantum machines available for jobs can be obtained from IonQ’s website.
Once ready, run the following command to execute the example on IonQ:
./out.x
You shall receive an output back in the prompt (from IonQ) as below:

You can cross validate your job run on the IonQ API job log, which confirms the job you ran and what hardware was used on the Quantum provider.

Summary
The tutorial concludes with providing easy way to access scalable and agile HPC infrastructure to launch NGC CUDA Quantum images, to perform Quantum Algorithm Research and Simulation on a variety of hardware supporting CPUs, NVidia GPUs and the NVidia supported QPU hardware providers.
References
Nvidia
Wikipedia