
Running a Basic Job
Updated January 4, 2023
Overview
This topic walks you through how to run a basic job on the Rescale platform.
About jobs
A job is the basic unit of computing on the Rescale platform, allowing you to quickly set up and run a high performance computing (HPCThe use of parallel processing for running advanced applicat... More) job in the cloud.
To set up a job, you’ll configure the application(s) you want to run, decide the type of hardware you want to run it on, and specify how long it should run. You can also optionally add input files and configure post-processing via script or by filtering out any unnecessary files after the job completes.
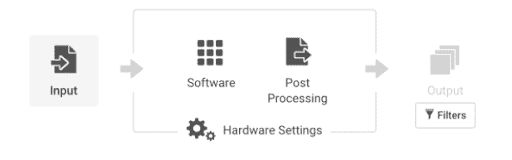
When you submit a job, Rescale will start up the selected hardware, run the application(s), and then clean up everything when it’s done. From there, you can review and analyze the results.
About this example simulation
This example uses the OpenFOAM simpleFOAM solverA solver is a numerical algorithm or a software tool that so... More running on the Emerald coretypePre-configured and optimized architectures for different HPC... More.
This is a steady-state solver for incompressible turbulent flow and can be used to find a reasonable initial condition for a transient analysis. This 2D example modelA numerical, symbolic, or logical representation of a system... More of a steady state flow around an airfoil was taken directly from a tutorial in the OpenFOAM Code repository.
You can access and download the necessary input files by clicking the Import Job Setup button below.
Please contact us if you’re having trouble.
Sign up and log in
If you have not done so already, you will need to sign up for a Rescale account.
After signing up for a free trial, you will receive a verificationVerification is the process of ensuring that each stage of d... More email with a link to the platform site. You can then log in to the Rescale site.
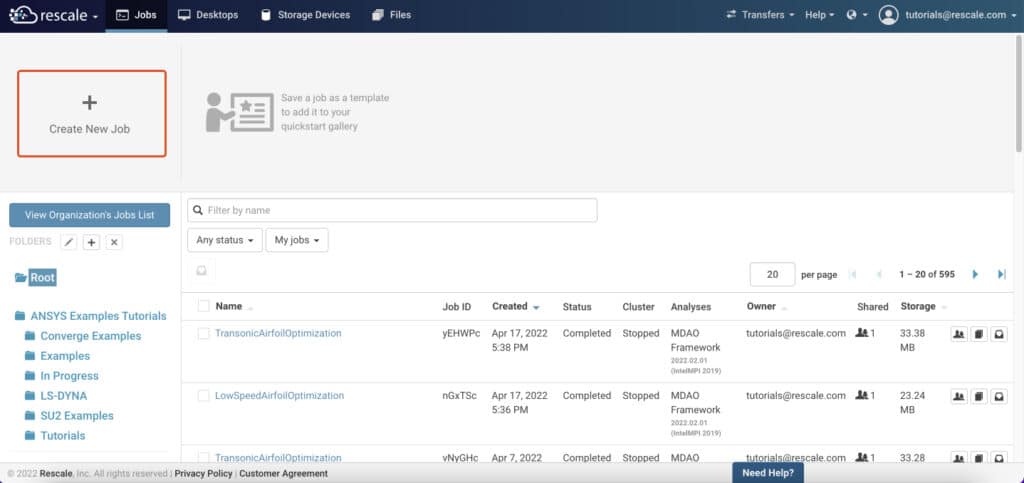
To start a new job, select Jobs > Create New Job.
All necessary input files for this example are inside the compressed archive airfoil2D.zip.
Input files
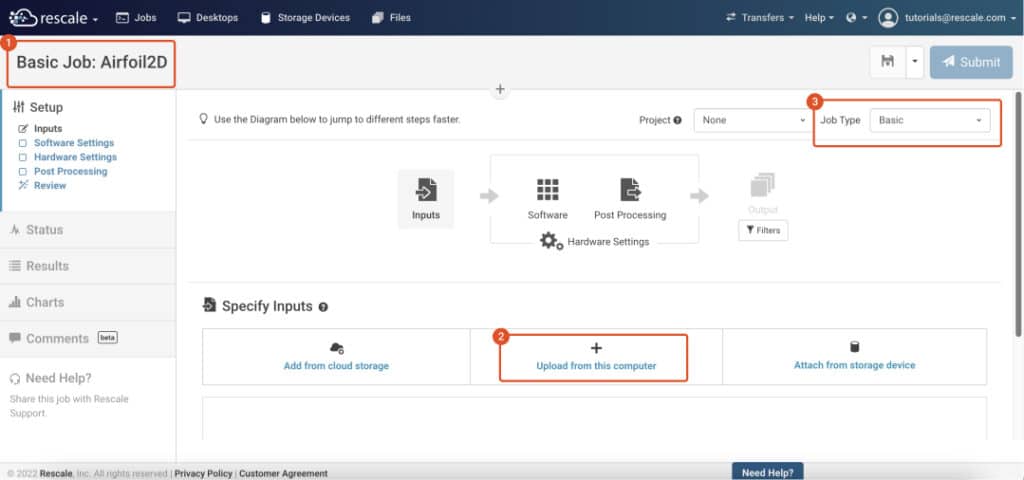
To run a basic job, set the following highlighted fields below:
- Give your job a name. Here, we use Basic Job: Airfoil2D (1).
- Add the sample job file set. All necessary input files for this example are inside the compressed archive
airfoil2D.zip(2). - Check that the Job Type is Basic (3).
Best Practice: Use compressed files to speed file transfer times
When working on your own jobs, you may want to consider uploading your input files as a compressed archive/file, allowing you to upload a collection of input files for a job all at once. Advantages include:
- Reduced storage needs
- Faster uploads
If a compressed archive/file is included as an input file for a job when your clusterA computing cluster consists of a set of loosely or tightly ... More is launched, any files in the zip file are automatically extracted to your job’s work directory prior to the job being run. When you refer to files extracted from zipped archives in your command line or script, be careful with the relative paths to your files.
The zip file itself will remain in storage for you and can be used again as input for subsequent jobs if you choose to do so. The supported compressed formats are:
- .zip
- .tar, .tar.gz, .tgz, .gz
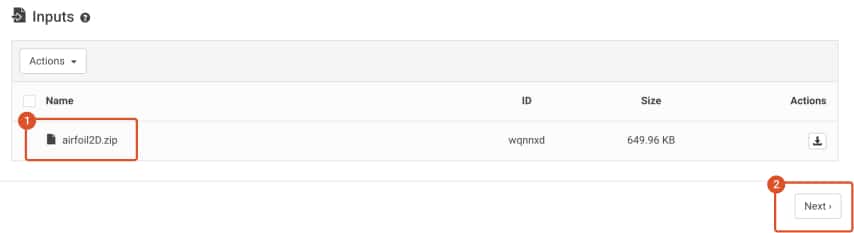
When you are finished configuring your input files, the Input Files setup page should look like the example below. To continue the setup process, click Next.
Software settings
After attaching your input files, select the software you need to run your job.
Select OpenFOAM by entering OpenFOAM in the search field and click the OpenFOAM icon.
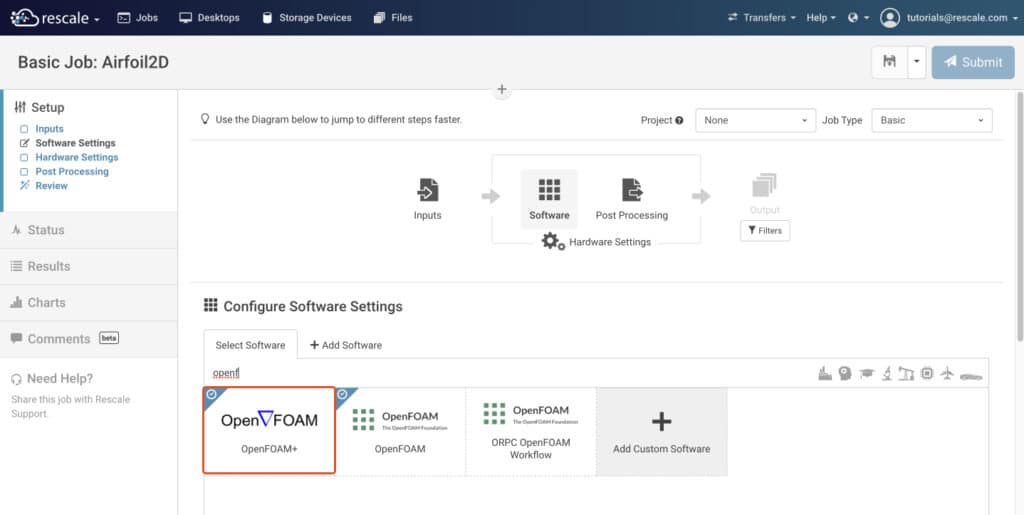
Next, choose the version number of the analysis code selected (1) and specify the Command text field that defines the command line used to run the simulationSimulation is experimentation, testing scenarios, and making... More (2).
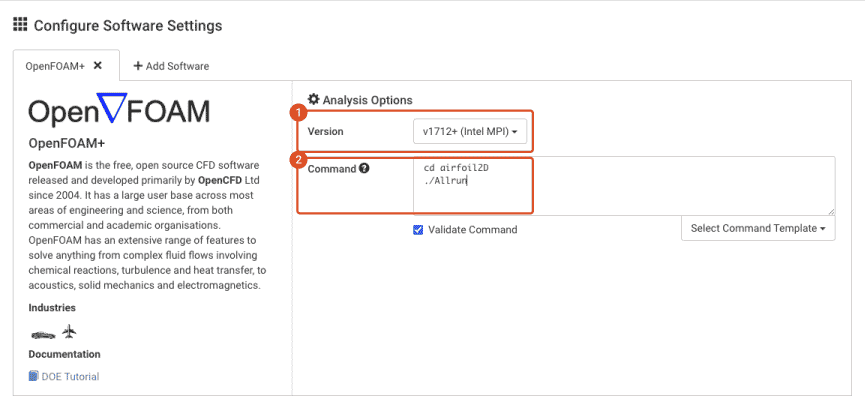
For this example, you’ll need to select OpenFOAM version v1712+ (Intel MPI) and edit the Command field as follows:
cd airfoil2D
./Allrun
The Rescale platform automatically extracts the Allrun script with other runtime files contained in the compressed archive airfoil2D.zip prior to beginning the simulation.
When you have finished configuring your software settings, select Next to go to Hardware Settings.
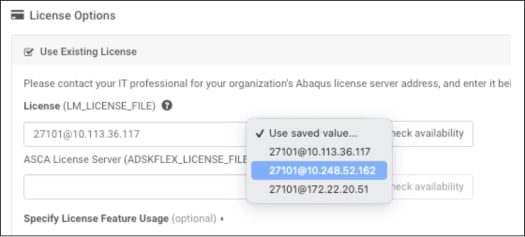
Using an existing license
While running some jobs, you may want to use your organization’s existing license for the selected software. Rescale allows you to use a traditional software license (a license from an existing ISV) you have already purchased in conjunction with the various simulation tools deployed on the platform.
When you run a job for the first time, you will need to fill in the settings for the existing license. For any subsequent jobs using the same software, the existing licenses will appear in a dropdown. You can later add and edit these entries by logging into the Site Admin page.
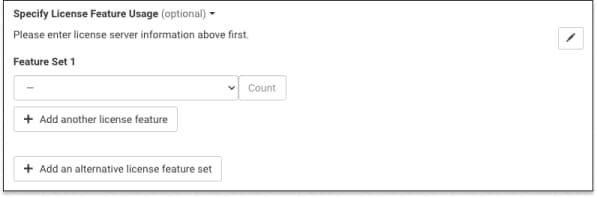
You can also optionally specify license feature usage, which will be used to determine whether there is sufficient license availability for the application to run. Otherwise the job will be queued until license features become available.
Hardware settings
After selecting your software settings, you’ll need to configure the hardware on which you want to run your job.
For a basic job, there are three hardware settings to edit: Coretype, Number of Cores, and Walltime.

In this case, select 1 for the Number of Cores (1), 1 Hrs for the Walltime (2), and Emerald for the Corean individual processing unit within a multicore processor o... More Type. Rescale offers On-Demand and On-Demand Pro coretype options. You can find more information on these options here.
Best Practice: Rescale offers On-Demand Priority and On-Demand Economy coretype options for some coretypes, allowing you to choose your job service level and price point. You can find more information on these options here.
When you have finished configuring your hardware settings, select Next to go to the Post Processing screen.
Note: This basic job example omits the optional post-processing step, but you can learn more about post-processing here. The Rescale platform’s post-processing functionality allows you to extract, process, and display selected data from output files directly on the Rescale platform without the need to transfer data to your local machine.
To continue to Review, click Next again from the Post Processing screen.
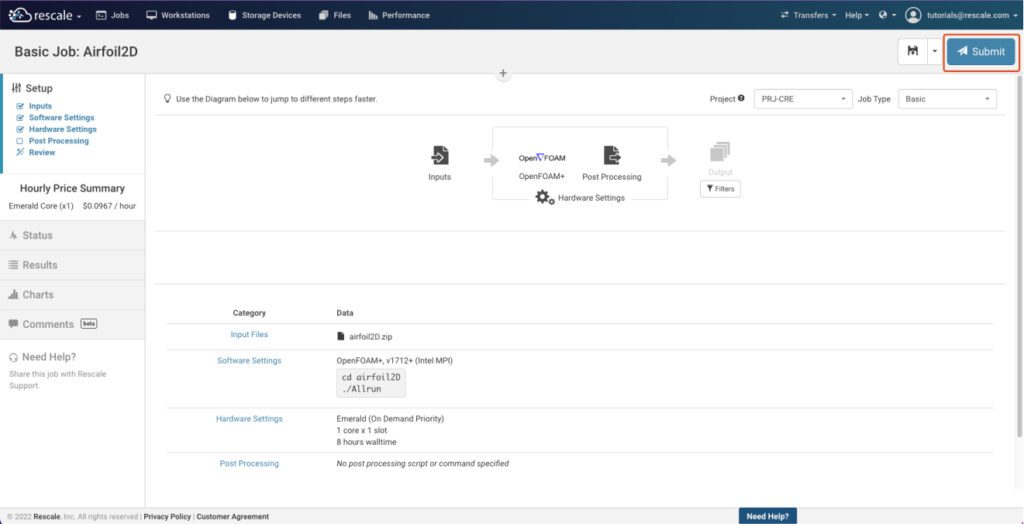
Review
The Review step shows you a summary of your job prior to submission.
If you are finished configuring your input, software, and hardware settings, select Submit to begin running the job.
When you a job on the Rescale platform, a billing precondition check is run to determine if the job charge can be paid.
If the workspaceWorkspaces allow rescale customers to create dedicated teams... More has enough credit or deposit to cover the charge for the first hour of the job, a job is allowed to run. In case the credit or deposit is not enough, the job fails at this precondition. A job may pass this precondition if the workspace has a valid credit card on file.
If the workspace credit or deposit runs out (goes down to $0 or ¥0) while a job is running, the job is terminated, unless the workspace has a valid credit card.
Status
Once your job has been submitted, Rescale displays the status panel so you can monitor the progress of your new job.
The Status page allows you to monitor all aspects of the job that Rescale manages for you. As your job runs, it will go through five stages to successful completion: Queued, Validating Input, Starting Cluster, Running Job, and Stopping Cluster.
If there is an error during any of these job states, a red X appears in place of the checkmark icon after running. Please contact us if you encounter an error during one of these job states.
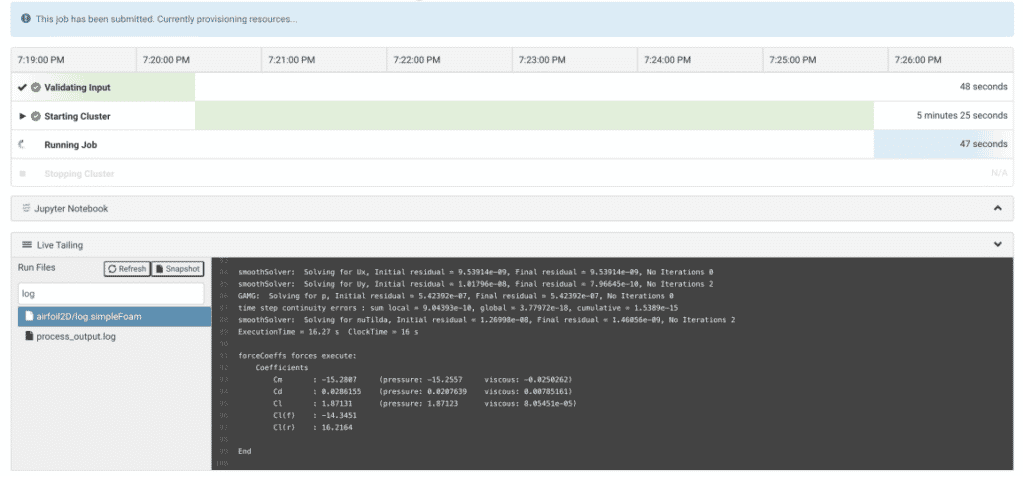
The Status page also allows you to view the contents of output files in real-time, which is known as live tailingalso referred to as real-time log monitoring or live log str... More a file. This helps monitor the progress of a job. In this case, the two output files of particular interest are:
process_output.logairfoil2D/log.simpleFoam
The process_output.log file is created for every Rescale job and contains all the terminal output (stdout in Linux parlance) from the command as it is executed.
The log.simpleFoam file is a file specific to the OpenFOAM computation and contains information on the progress of the simulation.To live tail a file, click the name of the file you want to view. For example, airfoil2D/log.simpleFoam. It will only take a few minutes to run the job.
You can learn more about monitoring your status here.
Results
After the job completes, the Results page opens with a list of generated files, such as log files, visualizations, and graphs.
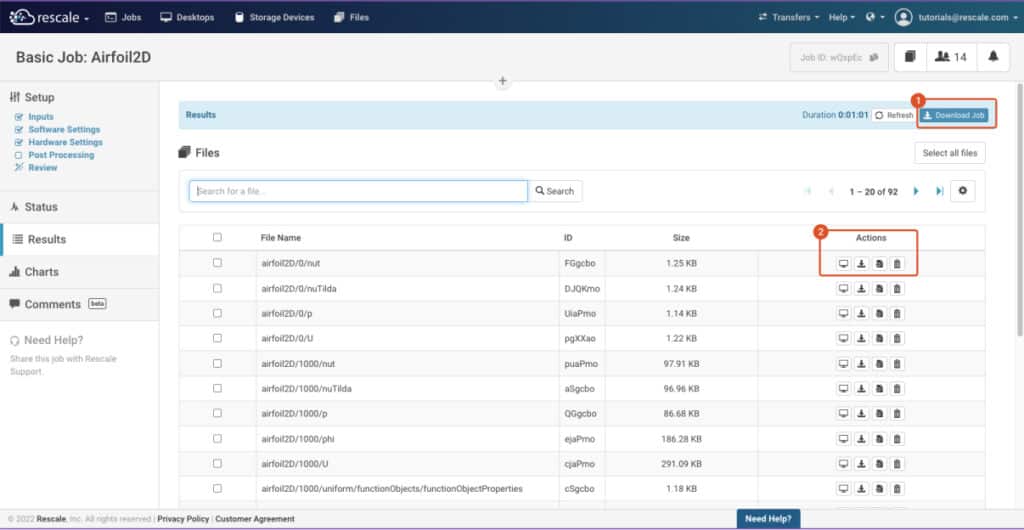
From this page, you can:
- Download all files to a .zip file using the Download Job button (1).
- Use the Actions icons (2) to act on selected files:
- View – View files under 1MB directly in your browser. For files over 1MB, use the Download action.
- Download – Download selected files.
- Make selected files available as input files – Can be used for rerunning certain parts of the job without having to run the complete job again or for post-processing in end-to-end desktops.
- Delete – Delete selected files.
For more information on how to download and manipulate files on the Rescale platform, see the Downloading Data topic.
You can also learn more about managing your job results here.
Next Steps
Congratulations! You have run your first example job on the Rescale platform. Check out the following topics to learn how to use or further optimize your job results:
- How to share and clone jobs.
- How to post-process your results.
- How to skip download time by analyzing your results using an end-to-end desktop.
- How to leave comments on jobs to collaborate with other team members.